www.theflowerbin.net
www.theflowerbin.net

Dutch
Iris is among the earliest of the spring blooming bulbs, often emerging through
the snows of late winter. The striking colors of Dutch Iris are a sure sign
spring is on its way. Fall is the best time to plant Dutch Iris and right now,
you'll find these bulbs in convenient packages, ready to take home and plant.
Dutch Iris will do best when planted in full sun and in well-drained soils.

To
improve your soil, plan to add 2" or 3" of compost or peat moss to
the soil in the existing bed and mix it in thoroughly.
While you're at it, work
in some Dutch Bulb Food, at the rate of 4 cups per 50 square feet. Plant your
Dutch Iris bulbs about 4" deep. After planting, water the bed
thoroughly. Your bulbs will start
rooting right away. As the temperatures cool down, Dutch Iris will go dormant.
When the soil warms up in the spring, your bulbs will wake up and begin to grow
and bloom. Another way to enjoy Dutch Iris is to force them indoors. Forcing
bulbs is a way to accelerate the blooms by cooling the bulb off indoors. Like
most fall bulbs, Dutch Iris need a "cooling off" period before they
will bloom. In this case, the cooling period is about eight weeks. You can use
any container to plant your bulbs as long as it has drainage.
Fill the pot with
potting soil,
then place your bulbs closely together in the pot
and cover with potting soil. Bulbs need
to be chilled for eight weeks at 35 to 45 degrees F. You can use an unheated
basement or crawl space or the refrigerator if you have space. After the bulbs
have chilled for eight weeks, move them to a warm, sunny location and water
regularly. You'll soon see the bulbs push up through the dirt and start to
bloom. For more blooms through the winter, start several bulb pots a couple of
weeks apart. This is a great way to add indoor color to the holidays. Some popular Dutch Iris available now include
Dwarf Iris Iris
histrioides ʹKatherine Hodgkinʹ is among the shorter Dutch Iris at 6ʺ.
Katherine Hodgkin also blooms earliest, emerging in early spring.
White
Wedgewood hollandia blooms in mid-spring and grows to about 24" tall.
Dutch Iris Iris hollandia ʹMauve Queenʹ blooms late spring and grows to about
18ʺ.
Dutch Iris hollandia ʹGolden Beautyʹ blooms later in spring and gets about
24ʺ high.
Dutch iris Iris hollandia ʹBlue Ribbonʹ late spring bloomer 24ʺ
high. Dutch Iris bulbs are a great
choice to add color to your garden in from early spring on and these hardy
bulbs will multiply and spread naturally, giving you spring color for many
seasons to come.

The
cooler fall weather is bringing about a change in your lawn. The grass isn't growing as vigorously, there's
less top growth and typically, you're mowing less frequently. While top growth
has slowed down, grass roots are still very active storing nutrients and
moisture, getting ready for the winter season.
All this activity at the root level makes this time of year an important
time to feed your lawn. Applying lawn fertilizer in October benefits your lawn
by strengthening the root system and getting the grass ready for winter.
The most important nutrient for fall lawns is
Nitrogen, the first number listed on the bag. Fertilome Winterizer contains 25%
Nitrogen, plus Phosphate and Potassium to help your lawn absorb and store the
fertilizer you apply now. A 20 pound bag of Fertilome Winterizer will cover a
5,000 square foot lawn. A forty pound bag of Fertilome Winterizer will cover
10,000 square feet.

Another choice for fall lawn fertilizer is RichLawn®
Fall & Winter Turf Food. This turf food is produced locally, is organically-based and has a 15-3-6 formula. Most of the 15% Nitrogen will be stored in the roots, where it will stay until the spring. This 40 pound bag of Richlawn® Fall & Winter Turf Food will
cover 6,000 square feet of lawn. The benefit of feeding your lawn now comes
next spring when the lawn emerges from its dormant state and there are enough
nutrients in the roots to feed the grass. This means quicker green-up and
stronger top growth early in the spring season.
After applying winterizer fertilizer, water your lawn thoroughly to help
the fertilizer get down to the roots.
In
addition to feeding your lawn, this is a good time to work on the soil your
grass grows in. You can aerate by hand or hire someone to aerate the lawn for you. Core aeration will help relieve soil compaction.
Leave the cores on the lawn. They will disappear in a few weeks.
Soil Activatvor
is granular humic acid. Humic acid helps break down clay and improve soil structure. Better soil structure encourages stronger root growth. will help your grass roots grow. Soil Activator helps your grass take up nutrients and fertilizer better.
Another soil supplement to add now is granular
Revive®. Revive® helps break up compacted soils, gets water to the
root system and helps your lawn take up iron, magnesium and other elements in
the soil. Water your lawn thoroughly after applying Revive® and Soil Activator.
In addition to watering now, your lawn will benefit from watering during the winter.
About every four to
five weeks, use a simple sprinkler to water your lawn. This will also benefit
the trees and shrubs planted in or near your lawn. Winter watering is especially important
where the lawn and trees are surrounded by sidewalks and streets.

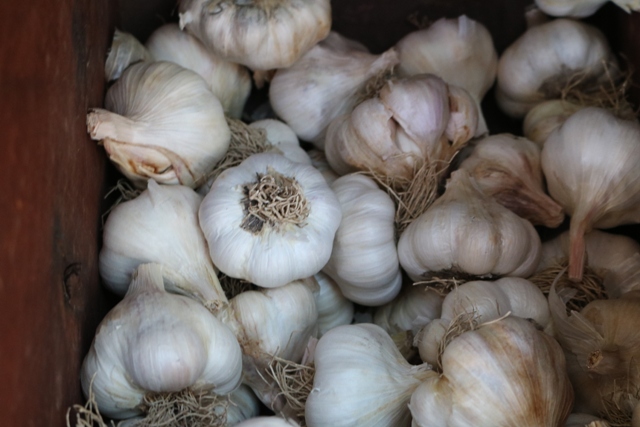
Garlic is a member of the allium
family, which includes leeks, shallots and onions. There are many varieties of
garlic, all of which fall into three general categories: Softneck, Hardneck and
Elephant. Softneck garlic is the kind you will generally find in the grocery
store. The two common types of softneck garlic are artichoke and silverskin.

Artichoke
garlic generally stores well and has a mild flavor, such as California White, Inchelium
Red, Susanville and Polish White. Nootka
Rose is a silverskin garlic with a very strong flavor. Softneck garlics have a flexible stalk which
can be braided.
Hardneck garlics also have a stalk –called a scape- which coils
at the top. If left to mature, hardnecks will produce a flower which is
actually a number of small bubils, or tiny bulbs, which are edible. Hardnecks
dry to a hard stem, hence the name. The most common Hardneck garlic is
rocambole. As a group, they have a deeper, richer flavor than softnecks do, but
they don’t store as well. Select Siberian Red for long lasting, strong flavor. Elephant
garlic is the largest garlic. It is also the mildest and sweetest. It is easy
to peel and has a long shelf life.
Garlic is typically planted in October. Start
with a good, quality bulb. Garlic purchased in grocery stores is often treated
with sprout inhibitors, disrupting the growth cycle.
Break the bulb, called
“cracking” into individual cloves.
These are the garlic “seeds”. Each clove or
seed will produce its own plant, containing 6-8 cloves per bulb.
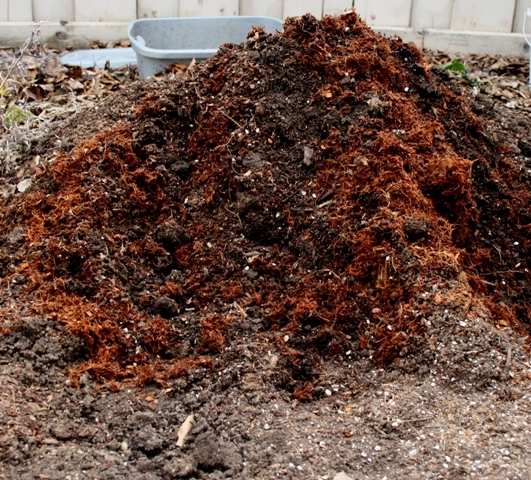
Garlic likes sun
and well-drained soils, so incorporate a good soil amendment such as Sheep,
Peat and Compost into your planting. This soil amendment is produced locally.
Add
some Bone Meal to the planting site, to encourage rooting. Garlic is a very
friendly plant and grows well planted with other flowers and vegetables in the
garden as well as in the perennial bed.
Plant each clove about 2” deep, pointy
end up and spaced about 5"
to 6” apart. Like other spring flowering bulbs, garlic planted now will set
roots and start to grow. As the soil temperature cools down, growth stops.
Garlic can be mulched in early winter, after the ground freezes. The mulch will
hold in moisture and keep the ground stable.
As soil temperatures increase in
the spring, the bulb begins its growth cycle.
As you see leaves emerge, feed
your garlic every two weeks with Fish and Seaweed or Age Old Grow. Keep the
area around your garlic weed free.
Garlic doesn’t like to be crowded. Garlic
planted now will usually be ready for harvest around July 4th.
Dig your
garlic when the leaves start to turn brown. It’s best to use a garden fork to
lift the garlic out of the ground.

You’ll
see them in early spring, often blooming through the snow. Early blooming
crocus are a sure sign that spring is on its way. The crocus flowers are soon
followed by daffodils, tulips and hyacinths, each bringing its own distinct
color to your garden. The spring blooms you see are from hardy bulbs that were
planted the fall before. Planting bulbs
is the best way to have a colorful spring garden and now is the time to plant
them.

Bulbs available for planting now are hardy bulbs, which mean they are cold-tolerant. They will survive our winter weather and
bloom for many seasons to come.
When it’s time to select the bulbs you’re going
to plant, there’s a lot to learn from the box the bulbs come in. Besides color,
the box label shows bloom time and height. If you want a succession of spring
color, choose early, mid and late blooming bulbs, of varying heights.
Bloom
time is dependent on where you plant your bulbs and how deep you plant them.
Bulbs planted near a fence or foundation are going to bloom sooner because the
reflected heat warms the soil up. If your bulbs are coming up too early or you
want to slow the bloom time, add 2" to 3" of mulch to the bed. To
ensure spring blooms, there are a few things you’ll need to know.
Where you
plant your bulbs is important. Bulbs need at least 6 hours of sunlight to bloom
properly. You could plant early blooming crocus and tulips in a normally shady
spot such as under a tree because crocus and early season tulips will have
bloomed before the trees leaf out in the spring. An alternative would be to
plant bulbs in pots and move the containers to the sunniest spot in your
garden.
As with anything you plant, better soil equals better results, so take
time to add amendments to the ground where your bulbs will be planted.
Good
soil amendments include compost, coconut coir and peat moss.
You can use a
spade or garden fork to prepare the ground.
Add some Dutch Bulb Food to the
ground before you place your bulbs, so the roots will grow into the fertilizer.
Augers and bulb planters are handy tools to have when
you're planting your
bulbs. Once the site is prepared, place the bulb in the ground with
the pointed
side up. With smaller bulbs it may be difficult to tell which side goes up. One
side will generally be flatter than the other. Place the flat side down.
As a
rule, plant the bulbs four times their height. A 2" tall bulb should be
buried 8" deep. Cover the bulbs and mark the spot where they are planted.
Water the site thoroughly. Check on your bulbs through the winter and water as
necessary. For best color, plant bulbs in groups.
In addition to Daffodils,
tulips and hyacinths don’t overlook specialty bulbs such as dwarf iris and
Dutch iris, allium and muscari. Planted now, these hardy bulbs will bring color
to your spring garden for many seasons to come.


 While you're at it, work
in some Dutch Bulb Food, at the rate of 4 cups per 50 square feet. Plant your
Dutch Iris bulbs about 4" deep. After planting, water the bed
thoroughly. Your bulbs will start
rooting right away. As the temperatures cool down, Dutch Iris will go dormant.
When the soil warms up in the spring, your bulbs will wake up and begin to grow
and bloom. Another way to enjoy Dutch Iris is to force them indoors. Forcing
bulbs is a way to accelerate the blooms by cooling the bulb off indoors. Like
most fall bulbs, Dutch Iris need a "cooling off" period before they
will bloom. In this case, the cooling period is about eight weeks. You can use
any container to plant your bulbs as long as it has drainage.
While you're at it, work
in some Dutch Bulb Food, at the rate of 4 cups per 50 square feet. Plant your
Dutch Iris bulbs about 4" deep. After planting, water the bed
thoroughly. Your bulbs will start
rooting right away. As the temperatures cool down, Dutch Iris will go dormant.
When the soil warms up in the spring, your bulbs will wake up and begin to grow
and bloom. Another way to enjoy Dutch Iris is to force them indoors. Forcing
bulbs is a way to accelerate the blooms by cooling the bulb off indoors. Like
most fall bulbs, Dutch Iris need a "cooling off" period before they
will bloom. In this case, the cooling period is about eight weeks. You can use
any container to plant your bulbs as long as it has drainage.
 Fill the pot with
potting soil,
Fill the pot with
potting soil,
 then place your bulbs closely together in the pot
 and cover with potting soil. Bulbs need
to be chilled for eight weeks at 35 to 45 degrees F. You can use an unheated
basement or crawl space or the refrigerator if you have space. After the bulbs
have chilled for eight weeks, move them to a warm, sunny location and water
regularly. You'll soon see the bulbs push up through the dirt and start to
bloom. For more blooms through the winter, start several bulb pots a couple of
weeks apart. This is a great way to add indoor color to the holidays. Some popular Dutch Iris available now include
and cover with potting soil. Bulbs need
to be chilled for eight weeks at 35 to 45 degrees F. You can use an unheated
basement or crawl space or the refrigerator if you have space. After the bulbs
have chilled for eight weeks, move them to a warm, sunny location and water
regularly. You'll soon see the bulbs push up through the dirt and start to
bloom. For more blooms through the winter, start several bulb pots a couple of
weeks apart. This is a great way to add indoor color to the holidays. Some popular Dutch Iris available now include
 Dwarf Iris Iris
histrioides ʹKatherine Hodgkinʹ is among the shorter Dutch Iris at 6ʺ.
Katherine Hodgkin also blooms earliest, emerging in early spring.
Dwarf Iris Iris
histrioides ʹKatherine Hodgkinʹ is among the shorter Dutch Iris at 6ʺ.
Katherine Hodgkin also blooms earliest, emerging in early spring.
 White
Wedgewood hollandia blooms in mid-spring and grows to about 24" tall.
White
Wedgewood hollandia blooms in mid-spring and grows to about 24" tall.
 Dutch Iris Iris hollandia ʹMauve Queenʹ blooms late spring and grows to about
18ʺ.
Dutch Iris Iris hollandia ʹMauve Queenʹ blooms late spring and grows to about
18ʺ.
 Dutch Iris hollandia ʹGolden Beautyʹ blooms later in spring and gets about
24ʺ high.
Dutch Iris hollandia ʹGolden Beautyʹ blooms later in spring and gets about
24ʺ high.
 Dutch iris Iris hollandia ʹBlue Ribbonʹ late spring bloomer 24ʺ
high. Dutch Iris bulbs are a great
choice to add color to your garden in from early spring on and these hardy
bulbs will multiply and spread naturally, giving you spring color for many
seasons to come.
Dutch iris Iris hollandia ʹBlue Ribbonʹ late spring bloomer 24ʺ
high. Dutch Iris bulbs are a great
choice to add color to your garden in from early spring on and these hardy
bulbs will multiply and spread naturally, giving you spring color for many
seasons to come.