www.theflowerbin.net

www.theflowerbin.net

Tuesday, March 31, 2015

Are you ready to plant some spring color?


Early spring is a great time to add some color to your garden. Here are four plants which are blooming now, just in time to compliment your daffodils and crocus blooms.
One thing these plants have in common is their need for soil that drains well.
As with any planting, it is important to take the time to amend the soil.
Adding peat moss and compost to the ground before you plant helps your new plantings root and thrive.
You can also add some Bone Meal to the bottom of the planting hole to give your new plantings a boost.
Rocky Mountain Columbine 'Swan Pink & Yellow'.  Columbine grow well in partial shade and soil that drains well.
Speaking of columbine, don’t over look 'Cameo® Blue and White' for beautiful blue colors.
Lenten Rose 'HGC Pink Frost' Hellebores are easy to care for. They like well-drained soils and will do okay in slightly alkaline soil. If you’re looking for a shade-loving plant, this is a good choice. Helleborus x ballardiae.
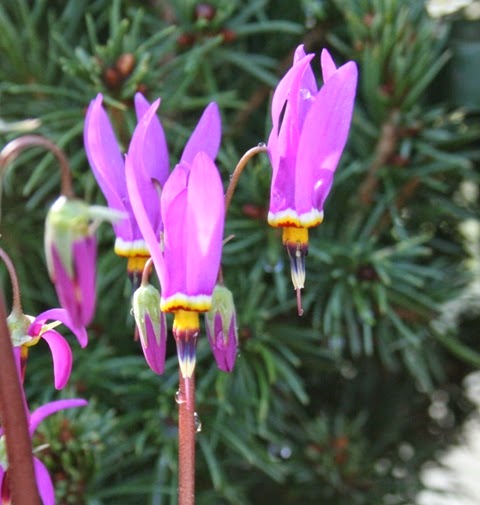
Dodecatheon meadia is a member of the primrose family and will do well in sun to partial shade. 'Shooting Star’
Lewisia is a selection of a native American plant. Lewisia thrives in well-drained soil and can be planted along borders, in rock gardens or in terracotta pots. 'Elise Mix'

Tuesday, March 24, 2015

Tips for growing vegetables in containers.


Container vegetable gardening allows you to grow your own produce almost anywhere. Some of the factors you’ll need to consider in order to be successful growing vegetables in containers includes deciding what do you want to grow, where are you going to put your containers to get the best light, what  size of container do you need, which soil to use and then learning good container gardening practices such as watering, fertilizing. In the first part of this series we look at location and container selection. If you want to grow tomatoes, peppers and other fruiting vegetables, you’ll need a spot that receives at least 8 hours of full sun every day. Root vegetables such as potatoes, carrots, onions need at least 6 hours of sunlight. Leafy vegetables and herbs need at least 4 hours of sunlight. When selecting a container, size and drainage are key factors.
You look for a container that’s big enough to support your plants without tipping over, can hold enough water without drowning your plants, can handle the sun, wind and temperature swings and still look good. For larger plants like tomatoes and potatoes, choose at least a 5 gallon container for each plant.
For herbs and leafy vegetables, you can use smaller containers. Make sure the container you choose has drainage holes to allow excess water to drain off. No matter how careful you are, water will build up in a container without drainage and ruin your plants. Adding rocks or pot shards to the bottom doesn’t work.  The water will still build up.
There are advantages for every type of container you may use. Plastic pots are light weight and come in a variety of colors, shapes and sizes.
Terra cotta and clay pots are garden classics. Ceramic pots offer a variety of colors, shapes and sizes. Next up, choosing the right soil and fertilizers for your vegetables.  

Tuesday, March 17, 2015

Extend your gardening season with a Wall-O'-Water.


A Wall-O’-Water is an easy way to extend your gardening season. The earlier you can start your tomatoes, peppers, eggplant and other warm-weather vegetables, the sooner you can start picking. Wall-O’-Waters act like mini-greenhouses to protect your young plants from frosty weather. Set up your Wall-O’-Water 6 to 8 weeks before last frost date. In Longmont the average last frost date is May 8th. Set up your Wall-O’-Water at least one week before you actually set out your plants. This allows the soil to warm up under the Wall-O-Water and reduces transplant shock.
Amend the soil with some compost before you set up your Wall-O’-Water.
Dig the compost in about ten to twelve inches deep. Open the package and select one of the three Wall-O'-Waters.
You can hold the empty Wall-O’-Water in place with stakes or an empty 5 gallon bucket.
Fill each of the Wall-O’-Water tubes about two thirds full and allow the tubes to fold into themselves.
This will form a teepee and help protect your young plants.
While the soil is warming up under the Wall-O’-Water, start setting your young plants outside for a few hours at a time. This is called “hardening off” and it allows your starts to become accustomed to the outside temperatures and conditions.  As your plants grow and temperatures warm up, fill up each of the tubes to the top. Your Wall-O’-Water is now ready for you to add a tomato cage. Keep your Wall-O’-Water in place at least until mid-June. Keeping the soil warm and protecting your plants will help you pick fruit sooner in the season. Your Wall-O’-Water is reusable so store it in a safe place until next season.


Photo credit: wmmorris, nestbox

Tuesday, March 10, 2015

Grow your own onions


Planting Onions

 
Onions can be planted from “sets” which look like small bulbs,
 from small plants which come tied in bunches or from seed. Usually, we’re able to plant onions from mid-March through early May.
A simple test will tell you if your soil is ready to dig in. Squeeze a fist full of soil and then let it go. If it crumbles like a cup cake, it’s okay to dig in.
Prepare your bed by working in some organic material, such as Sheep, Peat and Compost.
We’ve add some Coconut Coir to this mix. Dig up the bed at least 6" deep.
Work in some slow release nitrogen and phosphate to your planting bed. You can use Bone Meal and Blood Meal. Plant your onions close together about 2" apart.
Sets should be planted about 1" deep.
Onion plants should be planted just deep enough to hold them upright. Water your onions often enough to keep them consistently moist. You can feed them every month with blood meal. As they grow, you can pick and eat every other one. This will give the ones you leave in the ground plenty of room to grow. You have lots of choices for onions. Onion Candy is very sweet and produces in about 85 days. Super Star is a white onion which takes about 95 days to reach maturity. Texas Supersweet takes 110 days and will store well for up to two months. Yellow Granex is a common yellow sweet onion. Yellow Sweet Spanish takes 110 days to mature and can produce some very large onions. Plan at least 125 days for Walla Walla onions to mature. These onions are very sweet! Nothing tastes like onions right out of your garden.


Picture Credits: wmmorris, S. Albert. Harvesttotable.

Tuesday, March 3, 2015

What's your soil type?


What’s your soil type? Here’s as simple test you can do to find out.
You’ll need a clear jar with a lid, a trowel, a scoop full of dirt from your garden and some dishwasher soap.
Dig enough soil to fill your jar about 1/3rd full.
Add 1 tablespoon of liquid dishwasher soap, then fill the jar about 3/4s full with water.
The foam at the top is soap suds. Put the lid on and shake vigorously to mix the ingredients. Set the jar aside and let it settle.
After a few hours, you’ll notice the heavier material will settle first, mainly rock and sand. The 2nd layer will show you how much silt is in the soil. The 3rd layer is clay and clay suspended in water. The 4th layer – if there is one is the organic material present in your soil.
Do the test in several areas of your garden. Here is another sample test jar. In this case we see sand, silt, clay and very little organic material. Once you know what you’re soil type is, you can use any number of soil amendments to improve your soil including peat moss, coir, compost, aged manure, yard waste (as long as you don’t use weed controls on your lawn), bagged amendments which combine sheep manure, peat and compost  and worm casings.