www.theflowerbin.net

www.theflowerbin.net

Monday, December 28, 2015

Eat healthier, with your own herb garden


Resolved to eat fresher, get healthier in the New Year? An herb garden is a great way to get started toward achieving your goals. There's nothing like harvesting your own herbs fresh from your indoor herb garden. Potted herbs are a great addition to your kitchen during the winter. They add a touch of greenery and raise your spirits. These gardens have been designed for you to take home and start growing your own herbs.

 
Asian Herbs: Thai Basil, Lemon Grass, Vietnamese Coriander


Bunch of Basil includes Genovese Sweet Basil, Lemon Basil and African Blue Basil

Because your cat needs something fresh, the Cat Lover garden contains Catmint, Catnip and Cat Grass

Lemon Madness: Lemon Verbena, Lemon Thyme, Mrs Burns Lemon Basil

Lovely Lavender: Goodwin Creek, French Fringed, Provence Lavender

Salad Herb Garden: Watercress, Red Veined Sorrel, Common Chives, Salad Burnet, Cutting Celery

Sweet Surrender: Stevia, Pineapple Sage, Chocolate Mint, Lemon Rose Scented Geranium

Tea Time: Spearmint, Stevia, Lemon Balm, German Chamomile

 Growing herbs indoors this winter,  you’ll be rewarded with fresh cooking herbs you grow and harvest yourself. Here are some tips to help you grow healthy herbs indoors. You can grow indoor herbs anywhere they will get enough light, such as a window ledge in the kitchen. Choose a location with at least 6 hours of sunlight, such as a south or west facing window. These culinary herbs will do best if they are continuously harvested.
Plan to feed your herbs every two to three weeks with a granular organic fertilizer. An indoor herb garden will provide the flavor and fragrance of fresh herbs all through the winter. 


Tuesday, December 22, 2015

Norfolk Island Pine Trees

Norfolk Island Pines are popular this time of year because many people use them as living Christmas trees. After the holidays are over, you can keep these trees as houseplants. Norfolk Island pines are tropical evergreen trees that you can grow indoors year round.

You can find Norfolk pines in a variety of sizes, from less than a foot to over 5' tall.
The smaller trees make ideal table-top Christmas trees. Keeping your Norfolk pine healthy and looking good through the holidays and beyond comes down to these things. Norfolk pines like bright, indirect light, at least 6 hours a day. It's a good idea to turn them every few weeks to keep them from growing lopsided. They do best with consistent watering, like most houseplants. Water your tree when the top inch or two of soil feels dry. Water thoroughly and be sure there is no standing water left in the saucer under the plant. Norfolk pines like to be in place where the room temperature is 60 to 70. The more difficult part of keeping your Norfolk pine looking lush is to provide humidity. Norfolk pines like high humidity. Some ways to increase room humidity is to group your plants close together, use a pebble tray under the tree or add a room humidifier. There's no need to fertilize Norfolk Pines during this time of year. With a little care, your Norfolk Pine will be around for many Christmases to come.

Monday, December 14, 2015

A garden tool you'll really use.


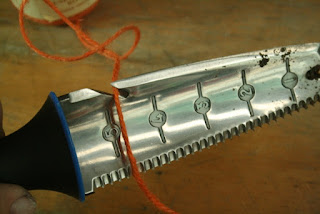
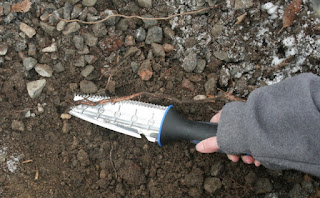
There are many tools which make your gardening chores easier, including shovels, bow rakes, digging forks, hoes and trowels. Then there are certain tools a gardener has that are indispensable. One of the most versatile tools you can own is a gardening knife, also called a hori hori gardening knife. A hori hori combines many of the features of your larger garden tools into a single, smaller form. You can get a lot of work done in the garden with a garden knife, including planting, weeding, digging, mixing soil, cutting open bags. Slicing little weeds, chopping bigger weeds, planting seeds, setting out plant starts, harvesting potatoes and other root crops, marking rows and removing roots are a few ways to use your hori hori.
In fact, once you figure out how useful a garden knife is, you'll want to have it with you everytime you walk into the garden. Gardening knives typically have concave-shaped blades with a sharp edge on one side and serrated edge on the other side and a pointed tip.
The concave shape is great for digging and scooping soil, just like a trowel. The blade shape is great for loosening soil and for mixing in soil amendments. The sharp edge can be used to cultivate and weed around established plants or even open a bag of soil.
The serrated edge can be used for cutting roots and loosening hard soils. Here's some things to look for when choosing a gardening knife.
The handle should fit comfortably in your hand, so it's important to try it out before you buy.
Many garden knives will have a handy ruler on  the blade, which makes planting bulbs, tubers and onions easier
.
Some garden knives come with a holster to hang on your belt, so your garden knife is always handy. The more you use your hori hori, the more you'll discover why this tool is a "must have" for any gardener.

Tuesday, December 8, 2015

How to take care of your Poinsettia plant.


December 12 is national Poinsettia Day, so named for Joel Roberts Poinsett who introduced the poinsettia plant to the United States from Mexico.
Today, we can enjoy dozens of varieties of poinsettias, all stemming from the development of those original plants. You should know that poinsettias are not poisonous, though some people are sensitive to the white sap they produce. Poinsettias have thin foliage leaves that vary in color from pale to dark green.

The showy parts of the poinsettia that most people think of as flowers are actually specialized leaves, called bracts. The actual flowers are the tiny yellow clusters found at the very center of the bracts. In nature, the brightly colored bracts are there to protect the plant and to attract insects to the flowers in order to spread the pollen.
Poinsettias are available in a wide variety of breathtaking colors from solid red to variegated leaves.
Poinsettias can be colored  with food-based dyes to create some amazing colors. Proper care for your poinsettia begins before you leave the store. We will carefully bag your poinsettia when it’s cold to protect it on its way home. Once you get your poinsettia home, unwrap it and place it in a room where it will get bright light, but not direct sunlight. Poinsettias don’t like drafts, either hot or cold, so keep away heater vents, fireplaces, doors and cold windows.
The ideal room temperature should be around 70°F during the day and no cooler than 60°F at night. Place the plant high enough to be out of the reach of children and pets and away from traffic. Set the plant in a water-proof saucer. If the pot is wrapped in foil, be sure to cut a drain hole in the bottom of the foil, so the plant will drain properly. Water your plant thoroughly when the soil surface is dry to the touch. Add enough water to soak the soil to the bottom of the pot, then dump any excess water from the saucer. Fertilize your poinsettia every 2 to 3 weeks with a 20-20-20 fertilizer.
With the proper care, your poinsettia will last through the holiday season and retain its beauty well into the New Year.
If you decide to keep your poinsettia after the holidays, you should care for it as you would any other houseplant. Keep it in a bright location, out of direct sun and water it regularly.

Tuesday, December 1, 2015

Choosing your Christmas tree


When choosing a tree, the Christmas tree varieties that have the best shape, color and superior needle retention include: Balsam fir, Douglas fir, Fraser fir, Noble and Nordmann fir.
Balsam fir trees have a nice shape with short, flat dark green colored needles. Their flexible branches make them easy to decorate.
Douglas firs can be purchased as plantation grown trees or forest cut trees. Plantation grown trees are normally sheared for shape and density.
Forest cuts are grown naturally without shearing and shaping. Forest cuts are like "Charlie Brown" trees. Douglas firs have a nice shape, rich green color and good needle retention.
They are very fragrant. You can keep that fragrance going by snipping off a small bit of some of the branches every day or two. Pick a branch that's hidden and cut off a little bit of the end. This will open the branch and release the fragrance.
Fraser fir trees are noted for their shape, their dark green needles and nice scent. There is adequate space between the branches to make decorating easier.
Nordmann firs have a very symmetrical shape, with open branches, making it easier to hang ornaments.
They have very good needle retention. Regardless of the type of tree you choose, here are some basics. You’ll do well to go looking for trees knowing how tall a tree you want and how large a tree your tree stand will accommodate. Choose a tree at least a foot shorter than your ceiling. Measure the opening of your tree stand so you’ll know how big a tree base will fit in it. When choosing a tree, freshness is important. Run your fingers along the needles. They should feel soft to the touch. Shake the tree. A fresh tree will not drop a lot of needles. Once you have chosen a tree, we’ll give it a fresh cut off the base. This is important because will make it easier for the tree to take up water. Use a tree stand that holds at least a gallon of water. Keep your tree well watered. Trees can take up several quarts of water daily, so check the water level in the tree stand frequently. Don’t let the water level fall below the base of the tree or the cut end may seal over, preventing the tree from taking up water.
If you choose and the tree will fit, we'll wrap the tree using our Christmas tree bundler. This will make it easier to transport the tree and to get it in the house once you get home.


Tuesday, November 24, 2015

The Flower Bin Holiday Open House


A long-standing Flower Bin tradition continues this weekend as Christmas begins at The Flower Bin Holiday Open House, Friday, Saturday and Sunday November 27, 28 and 29. There will live entertainment featuring
Harpist Jenilee Elsbend
and Jeffery Rogers on the Hammered Dulcimer.
Santa Claus will pay a special visit on Saturday, November 28, from 11 am to 3 pm and Sunday November 29 from 2:30 pm to 4:30 pm. 
Bring your camera for great family shots with Santa.  
Enjoy holiday cookies and apple cider while you shop the best in decorations including:
live and
cut trees, wreaths, garland, ornaments and featuring
Flower Bin grown Poinsettias.
Start a tradition by making the Christmas Open house a “Must Do” to kick off your holiday season.

Tuesday, November 17, 2015

Getting your roses ready for winter.


Mid-November is the right time to get your roses ready for winter. Most of the winter damage to roses and perennials comes from temperature fluctuations, dry winds and lack of moisture. It's not uncommon for the winter daytime temperatures to be surprisingly warm, followed by very cold nights.
Freezing night time temperatures followed by thawing out during the day can affect the soil around your roses and cause root and graft damage. There are three things to do now. First, make sure your roses are well hydrated, so give them a good drink of water. Plants with dry roots suffer more in cold temperatures than plants with wet roots. While you're at it, water your trees and shrubs as well.
Second, prune back canes to about 24".
Save any major pruning until spring.
Remove any spent flowers
and rose hips. Remove any obviously diseased leaves. Clean up any leaves and debris to prevent diseases from wintering over at the base of the rose, before you add mulch. 
Third, add 8" to 10" of mulch your roses to keep the ground cold and stable. Adding mulch at this time helps stabilize the soil temperature and prevent damage due to the freeze/thaw cycle. Mulching also helps prevent moisture loss. Roses that have been watered well and then mulched stand a better chance of surviving the winter than roses with dry roots. Choose mulch that will stay in place through the winter. Cedar mulch and Gorilla Hair mulch are two good choices. They will stay put without matting down.
Rose collars can also be used to help keep mulch in place.
Place the rose collar around the rose, fasten it and fill with mulch. For climbing roses, follow the same procedure; clean up around the base of the rose, water well and mulch. Don't prune climbers at this time. You can secure the canes to their trellis or bundle the canes together and wrap them with burlap for protection.
You can spray with an anti-desiccant such as Wilt-Pruf to help canes from drying out. Remember to water your roses during the winter. Pick a nice day when the temperature is above 45° and water your roses, trees and perennials.