www.theflowerbin.net

www.theflowerbin.net

Monday, December 30, 2013

Remaking the fish pond.


Awesome! Beautiful! The pond looks great, how did they do that? These are just a few of the comments from visitors to the Flower Bin indoor fish pond, lately. And it has been an amazing transformation, one that took over a week to accomplish. Luis started with a vision of how he wanted the pond to look. It had been more than 10 years since we first installed the fish pond at The Flower Bin and over those years, the fish and the pond have been a popular destination spot at the ‘Bin.
 Luis, with Nacho (pictured) and Rick’s help, began by removing as much of the old pond as possible, while leaving the fish alone as long as possible.  To finish the excavation, the fish were moved to a temporary holding tank, with supplemental pumps running for oxygenation.
Next, a woven fabric underlay was installed and then the rubber liner was set in place.
The old skimmer was replaced with one that holds two pumps instead of one. Piping was installed along both sides of the pond to feed each up-flow filter, at the top of the waterfall.
The skimmer and both up-flow filters act together to keep the pond water clear and healthy for the fish. The addition of two large sandstone slabs allows the fish to swim under the walk. This also hides the aeration pump, which runs 24 hours a day.
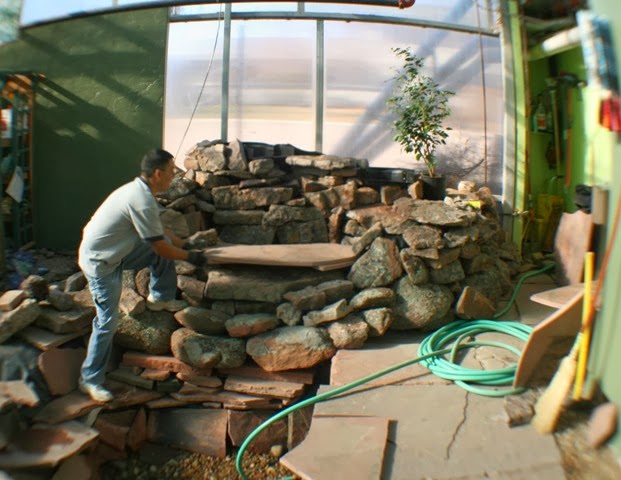
 Moss rock was carefully added to the exterior of the pond and a large piece of flagstone was set to enhance the waterfall. A stone path was laid to allow easy access to the pond.
The fish were carefully returned to their new home, where they enjoy entertaining visitors of all ages. Are you interested in adding a pond to your garden? Bring us your ideas and we will help you design the pond you’ve always wanted, including ordering the right equipment to keep your pond healthy and low maintenance. Go to our Pinterest account to see more images of the pond rebuilding project:   http://www.pinterest.com/flowbinco/rebuilding-the-pond/


Saturday, December 21, 2013

Gifts for the bird lovers on your list.


We carry a full line of feeders and seed including suet and suet feeders.
Suet offers nutrition and attracts birds that might not come to other types of feeders.
Tube feeders and platform feeders are a great way to provide seed mixtures to your birds. We also carry feeders designed to deter squirrels.
We have hand-painted bird baths, as well as glazed bird baths with matching pottery.
 
We have heaters, designed to keep water open when temperatures fall.
We have hanging humming bird feeders and ones that stick in the ground.
And for something different, we have bat houses in stock.


Tuesday, December 17, 2013

Gifts for the discriminating Gardener


Christmas shopping at the ‘Bin means great gifts for everyone, with choices from premier designers such as San Pacific International, Woodstock Chimes, Campania International, Good Directions and many more. In this blog, we highlight some of the items that special gardener in your life will enjoy receiving. We choose our outdoor décor items ranging from metal garden art,

 
to hand painted bird baths
to concrete statues

to unique and functional bird feeders.

You will transform your garden into a vibrant experience for all to enjoy with the gift of Flower Bin high quality garden décor.


Tuesday, December 10, 2013

Some gift ideas from the 'Bin


Some gift ideas from the ‘Bin. Choosing the right Christmas gift is important and you’ll find just what you’re looking for at The Flower Bin. Along with our spectacular poinsettias, our fresh Christmas trees, wreaths and garland, our gift house offers an excellent variety of candles, calendars, lotions, ornaments,
nativity scenes,

wind chimes
and so much more. We have wide brimmed hats that let you garden in style while protecting you from the sun. Choose from an assortment of colors, designs and sizes.

We have gardening gloves, aprons, hand towels and bags. We have handcrafted Bolga baskets.
 
Shop our indoor display of hand painted birdbaths, fountains and statuary (look closely to find the T-Rex statue).


We strive to carry unique gifts and holiday decorations. Shopping at the ‘Bin means great gifts for everyone.  We invite you to make us a part of your Christmas Tradition.

Tuesday, December 3, 2013

How to Care for Poinsettias.


How to Care for Poinsettias.

Here are some simple facts about poinsettias. Poinsettias are native to Mexico and Central America. Poinsettias were introduced in the United States by Joel Roberts Poinsett, a botanist, physician and the first U.S. Ambassador to Mexico. They were soon a very popular Christmas plant. December 12th is Poinsettia Day, which marks the death of Joel Roberts Poinsett in 1851. Poinsettias are not poisonous, though some people are sensitive to the white sap they produce.  Poinsettias have thin foliage leaves that vary in color from pale to dark green. The showy parts of the poinsettia that most people think of as flowers are actually specialized leaves, called bracts.
 
The actual flowers are these tiny yellow clusters found at the very center of the bracts. In nature, the brightly colored bracts are there to protect the plant and to attract insects to the flowers in order to spread the pollen. Poinsettias are available in a wide variety of breathtaking colors from solid red to variegated leaves.
Proper care for your poinsettia begins before you leave the store. We will carefully bag your poinsettia when it’s cold to protect it on its way home. Once you get your poinsettia home, unwrap it and place it in a room where it will get bright light, but not direct sunlight.  Poinsettias don’t like drafts, either hot or cold, so keep away heater vents, fireplaces, doors and cold windows. The ideal room temperature should be around 72°F during the day and no cooler than 60°F at night. Place the plant high enough to be out of the reach of children and pets and away from traffic. Set the plant in a water-proof saucer. If the pot is wrapped in foil, be sure to cut a drain hole in the wrapper (we cut a drain hole in the foil on the plants we wrap). Water your plant thoroughly when the soil surface is dry to the touch. Water the plant enough to soak the soil to the bottom of the pot. Remember to discard any excess water from the saucer. Poinsettias don’t like to sit in water. With the proper care, your poinsettia will last through the holiday season and retain its beauty well into the New Year.
 At The Flower Bin, we grow all of our own poinsettias, so you can be assured that the plant you are purchasing is locally grown and of the highest quality.


Tuesday, November 26, 2013

Fall Rose Care


Roses vary in hardiness, but all roses need some attention going into winter. This is because our winter temperatures can fluctuate widely and moisture levels will vary from month to month. Begin by cutting canes back about 1/3rd, to about 24" to 30". This is not an exact measurement, but it’s important to cut canes now to prevent damage from winter winds. Prune to the outward bud, so that future growth is toward the outside, away from the center of the bush. Don’t prune climbing roses at this time. Secure the canes to the trellis and spray with Wilt-Pruf® to prevent the winter winds from drying out and damaging the canes.

Remove any spent flowers or rose hips at this time. Clean up fallen leaves and petals from around the rose bush, to prevent black spot and other diseases from wintering over. Dusting the area with Sulfur will also help control disease and insects trying to winter over. Grafted roses need mulch to protect the graft bud from injury during the winter.
Own-root roses are typically better at surviving winters than grafted roses. What’s an own-root rose? These are roses that grow on their own roots, often Heritage or Old Garden Roses. Grafted roses have a bud or swelling just above the roots, where two different roses have been joined together. Grafted or own-root, all roses will benefit from mounding mulch up around the canes. This will serve to keep the ground stable and to prevent damage to the rose as the ground freezes and thaws during the course of the winter. This will also help retain moisture.
Soil Pep makes an excellent mulch for roses, as well as other perennials. It stays in place well and breaks down slowly, gradually improving the soil.
Adding Rose Collars will help keep the mulch in place through the winter. Water your roses (and other shrubs, trees, perennials) during the course of the winter. Pick a day when the temperature is above 40
°. Water around mid-day and confine your watering to the base of the rose. You want to get water to the roots, not the top of the rose. As always, you are welcome to bring your gardening questions or concerns to the Diagnostic Center in the Hardgoods section of the store.   


Tuesday, November 19, 2013

How to control those pesky black gnats on houseplants.


Fungus gnats are tiny creatures that invade your plants, living in the soil, getting in your coffee cup, drifting across your computer screen. More than a nuisance, fungus gnats can harm your plants, as the gnat larvae can feed on the roots of your plants. Their life cycle is very short: the adults live about 10 days, but in that time can lay up to 200 eggs.
Fungus gnats are generally more noticeable in the fall and winter months. When you bring in those houseplants that have spent the summer outside, you bring the bugs in also; fungus gnats, as well as other insects. Repotting your plants can also introduce fungus gnats, especially if the potting soil has a lot of peat moss in it.
Always use a quality potting soil, when you plant or repot your houseplants. Potting soils with moisture controls in them can make getting rid of fungus gnats more difficult.  To control fungus gnats, make sure you are not overwatering your plants. As the days get shorter in the winter, houseplants grow more slowly and require less water than they did in spring and summer. The soil stays soggy longer and attracts bugs. You need to adjust your watering accordingly. Make sure there is no standing water in the saucers under the plants. Fungus gnats can breed here.
Some products you can use to control fungus gnats include Yellow Sticky Traps. The adults are attracted to the color yellow and then stick to the trap. To control the larvae in the soil, apply products such as Food grade Diatomaceous Earth (DE).
This can be mixed into the first few inches of soil. Any adults or larvae that come in contact with DE will literally be sliced up. Mosquito Bits contain BTi, another naturally occurring insecticide that can be applied to the soil surface then watered in.
Systemic Insect Granules are another effective insecticide, when applied to the soil surface and watered in.  Both of these products effectively kill the larvae in the soil. Insect sprays include Insecticidal Soap, Neem Oil and Permethrin. A good time to spray is right after you water your plants. That is when you’ll see the adults scurrying around on the surface of your plants. Fungus gnats can be a nuisance in the fall and winter, but with the right treatment, they can be controlled. Bring your plant questions to The Flower Bin Diagnostic Center We’ll identify the problem and offer you the right solutions.  

Tuesday, November 12, 2013

How to plant and grow amaryllis.


Amaryllis are easy to grow and they add brilliant color to the holiday season. Begin by selecting a premium quality bulb. Generally, the larger the bulb the more stems it will produce and the more flowers per stem.

Once you’ve selected a bulb, choose a container, one with drainage. Amaryllis bulbs like to be snug when potted, so select a pot that is just slightly larger than the bulb.

Amaryllis will grow in plastic pots, however, amaryllis can get top-heavy, so clay or ceramic help keep the bulb upright while its blooming and it looks better. Double potting is also an option. Just slip the plastic pot into a more decorative one, as shown here.
Add enough potting soil to the bottom of the pot, so that about 1/3 or so of the bulb is exposed. Fill in the rest of the pot with potting soil,then water thoroughly.
Place the pot in spot where the temperature stays above 60°. The warmer the temperature, the faster the bulb will root and bloom.


Check soil moisture and water when the first inch or so is dry. Generally, you should see flowers in 7-10 weeks. Start fertilizing the bulb after the first set of leaves appear. Use a water soluble fertilizer designed for blooming and rooting and feed the bulb every two weeks.


Growing amaryllis in stones and water is easy and you get to watch the root development. Traditionally, amaryllis bulbs are forced in glass containers. Select a vase or jar slightly larger than your bulb and add river rock, marbles, and decorative glass pieces. Trim off any existing roots and place the bulb on top of the marbles or rock. Amaryllis can get top-heavy when they bloom, so add some more rock or marbles around the bulb to help keep it in place. Forcing amaryllis in water takes a lot of energy from the bulb, more so than forcing in dirt.  What that means is it may take many seasons for the bulb to recover enough to bloom again. Pinch off the flowers after they have bloomed and cut the flower stalk down to the bulb, once the flowers have faded. At this point, large bulbs will often send up a second set of flowers. Once the second set of flowering is done, remove the flower stalk, but leave the foliage in place. The green leaves of the amaryllis gather food to replenish the bulb.