www.theflowerbin.net
www.theflowerbin.net

Asiatic lilies are some of
the easiest and most reliable plants you can have in your garden. They are
perennials in our area, meaning they come back every year. Not only that, they
multiply quickly. Every season you’ll have more lilies in your garden, all
coming from your original planting. You can plant lilies from bulbs you purchase
in early spring or from 1 gallon containers.

There are several advantages of
planting container grown lilies instead of bulbs. First, you can see the plant
is healthy and thriving, which means the root system is established. Second, in
many cases the plant has started to bloom, so you can see what the flower actually looks
like. Asiatic lily flower stalks can range from 18" to over 4'. These stalks
are sturdy and typically will support themselves, without the need to stake
them. Asiatic lilies will do well in full sun or partial shade. Once you’ve
selected the site, amend your existing soil by adding 2" to 3" of
compost, manure and peat moss, worked in to about 8". Asiatic lilies like
well-draining soils and the compost, manure and peat moss will enrich
your existing soil and improve drainage.
If you’re planting bulbs, place each
bulb about 4" deep and about 6" apart.
If you’re planting established
lilies, dig a hole as deep as the container, add some bone meal, remove the
plant from the container and set it in the ground at the same height it was in the
container. Fill in around the plant and water thoroughly. In a short time, your
Asiatic lily will begin to flower and will continue to bloom well into July. Asiatic lilies will provide color
to your garden just as the spring blooming plants like iris and peonies are beginning to fade. The Lily Looks™
series of compact Asiatic lilies are great for containers, rock gardens and massed
together along the borders of your garden. Asiatic lilies are popular with
gardeners everywhere because of their low maintenance and big, bright, long-lasting
flowers. Here are a few of the many choices of Asiatic lilies:
'Hope',
'Country
Yellow',
'Rocket',
'Skyline',
'Ting Padhye'.

Dahlias
are one of the easiest and most spectacular flowers you can grow in your
garden. From mid-summer to first frost, they will flower almost continuously.
Dahlias
are available in a wide variety of colors, shapes and sizes, including ball
dahlias, decorative and dinnerplate dahlias and cactus dahlias.
All told, there
are fourteen distinct groups of dahlias. Dahlias are planted from tubers, generally
in late May through early June. This is the when the soil temperature is warm enough
to safely plant your tubers. Dahlias love the sun, so pick a place in the
garden that gets the most sun during the day. Dahlias will grow in an area where there is
some shade, but the plants will be taller and you’ll typically get fewer
flowers.
When you open the package your dahlias came in, you’ll find one or two
eyes on the tuber. Sometimes you’ll find the tuber has begun to sprout. That’s
okay. It’s still good to plant. Prepare the site by working in some compost and
peat most. Dahlias do best in slightly acidic soils. Since our soils tend to be
higher in pH or more alkaline, adding organic materials will help make the soil
more acidic and improve the drainage.
Add 3" to 4" of organic
material such as peat moss, compost and work it into your existing soil 8"
to 10".
Once you’ve prepared your soil, add a handful of Bone Meal and
work it in a little before you plant your tubers. The package your dahlia tubers came in can
provide valuable information about your dahlia, including height. Large
dinnerplate dahlias can easily reach 4' in height. Flower stalks this tall need
to be staked. It’s best to place the stake when you plant your tubers.
Set the
tuber in the hole with the “eyes” or stalk pointed up. Next, set the stake near
an eye or the stalk. Cover the tuber with soil and water deeply. As the
stalk grows, tie it loosely to the stake to give it support. To do their best,
dahlias need to be fed and watered regularly. Dahlias don’t need a lot of
Nitrogen, but they do need Phosphorous and Potash, so select a fertilizer with
numbers like 5-10-5 or 3-8-8. Fertilize your dahlias about 30 days after you
plant them and again in another 30 days. Water your dahlias deeply, twice a
week. Dahlias will not survive our winters, so you can elect to dig them up in the fall
and store them or simply treat them as annuals and plant new tubers every
spring.
Water
plants for your home pond or garden fountain will enhance the beauty of your water
feature and help improve water quality. Most water plants are tropicals and do
their best in full sun.

You'll learn a lot by reading the label that comes with
each plant. The label will tell you zone rating, height, planting depth and
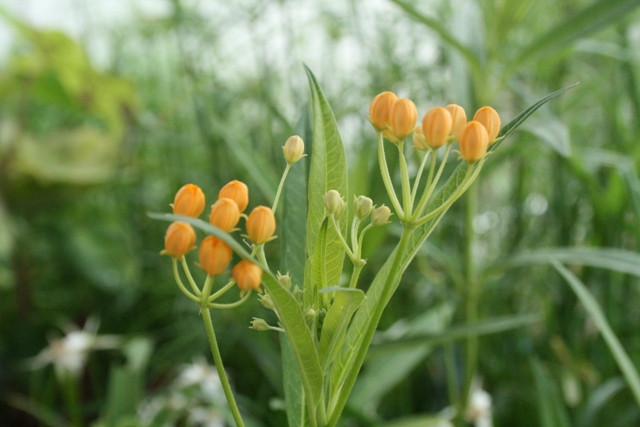
facts about the plant. For example, this Blood Flower tag tells you the
planting depth is 1 to 2. That means the plant will do well in shallow water.
It blooms in the summer when planted in full sun to partial shade. It is a
tropical rated Zone 8 and higher which means it will not survive our winter
weather. Plants with a rating of zone 4 have a better chance of
surviving through the winter. Besides adding interest and color, water plants
will help keep your pond cleaner. For best results, you should aim to cover about
½ of the pond's surface.
The easiest way to do this is to add floaters such as
water hyacinths and water lettuce. Take these plants home and release them on
the surface of the pond. Water hyacinths and water lettuce are really fast
growers and can cover the surface of your pond in a season. Water hyacinths and water lettuce
require full sun to do their best. They
multiply quickly in full sun and will shade and cool the water.
Water lilies
also help cover the pond surface and will bloom in full sun. Water lilies can
survive our winters provided they are submerged to a depth of 3 feet or more.
Submersed plants like Red Stemmed Parrot's Feather help oxygenate the
water, providing a better environment for fish. Aquatic plants also help absorb nutrients which reduces the algae food supply,
resulting in less algae. Add more interest to your pond with blooming water
plants such as cannas,
Asclepias curassavica Blood Flower,
Water Zinnias
and Star Grass.
Water hyacinths will bloom a delicate purple flower.
Plants with big leaves such as Colocasia will grow tall during the season
adding a different look to your pond. Water plants serve to accent the pond and
to protect fish as well as improve water quality. They will make your pond or garden
fountain a stand out feature of your landscape all summer long.
Here are some ways to get
more from your tomato plants this year. Pick the sunniest spot in the garden.
Your tomato plants need at least 6 hours of sunlight a day. 8 hours a day is
better. If at all possible, choose a spot where you didn’t grow tomatoes or
potatoes last year. Rotating your crops every year helps cut down on disease
problems. Great soil is a must for growing tomatoes, so plan to amend the site
with compost and peat moss.

Add 2" to 3" of compost and peat and dig
it in to your existing soil 6" to 8". Once the soil is amended, plant
your tomatoes on their sides in a trench, not straight down in a hole. This
method keeps your roots closer to the surface. They will develop more roots and
the roots will stay warmer through the course of the growing season. Warmer
roots will give you more tomatoes.
Start by removing the lower leaves from the plant. Next, dig a
trench deep enough to hold your tomato plant.
Add some tomato fertilizer such as
Espoma Tomato-tone or
Happy Frog
Tomato and Vegetable to the bottom of the trench. These fertilizers feed your tomatoes and they add calcium
and magnesium. Plus, they contain mycorrhizae, beneficial fungui which will
help your tomato roots grow bigger roots and take up nutrients more efficiently.
Place your tomato plant in the trench and add enough soil to bury the stem. When you get to the top of the tomato, gently build up the soil until the top of the tomato is upright. Now that your tomato is planted, give it
a good drink. Your tomato plants need to
be watered deeply and regularly through the growing season. Not watering consistently
can lead to many problems including
Blossom End Rot and cracking. Watering
inconsistently can also cause the flowers to drop and the fruit not to set. Avoid
watering your tomato plants overhead. Irrigate at the base of the plant.
Staking
is important because it keeps your plant upright which allows even exposure to
sunlight and helps produce more fruit. As your plant grows, pinch off any
suckers that form in the crotch of two branches. They won’t produce fruit and
they take away energy from the plant. Go easy on pruning the rest of the plant.
Removing too many leaves can damage your fruit due to sunburn.
Apply some dusting
sulfur. It’s organic and will help control disease and ward off insects.
Lightly dust the leaves and the soil around the plant.
Other supplements
include Blossom Set to help your plant set fruit and Calcium.
Calcium is
available in concentrate and ready to use sprays. Calcium will help reduce the
fruit ripen more evenly and help reduce Blossom End Rot problems. Doing these
things now and through the course of the growing season will help you grow
better tomatoes.
It’s
important to take your time when it comes to moving your new seedlings to the
great outdoors. This applies whether you grew your own vegetables and flowers
from seed or bought them from a greenhouse. Moving your plants from the house
or greenhouse directly into the garden without giving them time to adjust will
mean you'll lose most, if not all of them.
At the very least, you’ll set the plants back weeks due to transplant
shock. This slow transition from indoors to the outside is called “hardening
off”. Hardening off plants gradually exposes them to outdoor light, wind and
temperatures. The process is easy, but it takes time. In fact, you should plan
on a week or so to get your immature plants ready to transplant into the
garden.

On the first day, pick a
sheltered, shady spot under a tree or on the patio and leave them there for 3
or 4 hours. Bring them in that night. The second day, leave them out 5 or 6
hours, the third day 6 or 7 hours.
On the fourth day, set your plants in a
place where they will receive morning sun. Morning sun is not as harsh as
afternoon sun. This will help your plants adjust to direct sunlight. Gradually
increase sunlight exposure over the next few days. After 7 or 8 days, your
plants should be ready for the outdoors. Even then, you'll want to keep an eye
on the forecast. The average last day of frost is May 10, but this can vary
greatly. Be prepared to bring your plants back in if the night time temperatures
fall.
Products like Wall-O’-Water will protect your plants into the low 30°’s. N-sulate
is a frost blanket that will help protect your plants at night.
If plants are
small enough, throw a box or bucket over them to keep the frost off. Make sure
you keep your plants watered during this hardening off process. Being outside
means they will dry out faster, so keep an eye on the watering. Finally, when you’re
ready to plant, pick a cloudy day. This will help your plants make the
transition from container to the garden even easier.


 If you’re planting bulbs, place each
bulb about 4" deep and about 6" apart.
If you’re planting bulbs, place each
bulb about 4" deep and about 6" apart.

 'Hope',
 'Country
Yellow',
'Country
Yellow',
 'Rocket',
 'Ting Padhye'.