www.theflowerbin.net

www.theflowerbin.net

Tuesday, March 29, 2022

Choosing the Right Vegetable Garden Soil Amendments


Amending your garden soil in early spring is key to having a healthy, productive tomato and vegetable crop this season. A good soil amendment will make your existing soil healthier and more fertile by improving soil texture, helping to lower pH (makes your soil more acidic) and encouraging worms and soil microbes to flourish. Healthy soil promotes deeper root systems and makes nutrients more available to your vegetables. When it comes to choosing soil amendments, it’s important to use Colorado-based products that are specifically designed to work in our clay-based soils. That’s why we recommend and sell locally produced soil amendments and fertilizers from The Richlawn Company Organix Supply. For over forty years, The Richlawn Company has been crafting garden and lawn products specifically designed to work in our clay-heavy soils.


Located in Platteville, Colorado the original EKO Compost was developed in 1977 for use in vegetable and flower gardens, new lawns and for planting trees and shrubs. From that beginning, Richlawn has continued to expand their facility to accommodate the growing demand for their organic products. Recent improvements included additional outside storage space for 7,500 pallets of bagged soils (375 truckloads).  They now have 3.3 acres of land that is used for outside soils storage. This is in addition to over 1,000 pallets of fertilizers that are stored inside warehouses. One of our favorites, Earth Essentials products were developed in response to consumer requests for quality products they could use to improve their garden soil organically.  


Rich in trace minerals, organic material and beneficial microbes, Earth Essential’s Cow and Compost and Sheep, Peat and Compost improves the soil’s physical and biological health, resulting in healthier tomato and vegetable plants and better yields. Both products are thoroughly composted, eliminating weed seeds.  When it comes to applying either Sheep, Peat and Compost or Cow and Compost to your garden bed, a good rule of thumb is to add about two inches at any one time. One bag of Sheep, Peat and Compost will cover ten square feet, two inches deep. You can use this as a basis for calculating how much you'll need to buy to amend your current bed or start a new vegetable bed.  For example: a one hundred square foot vegetable bed would require ten bags of Seep, Peat and Compost in order to cover the bed with two inches of compost.  


EKO Raised Bed mix was developed in response to the popularity of raised bed gardening.  This mix of organic ingredients is designed to promote growth and optimize tomato and vegetable crop production in raised beds as well as large containers. For a ten cubic foot raised bed or container, you’ll need seven bags of Raised Bed Mix. A fifteen cubic foot raised bed or container will require ten bags.  


If you have questions about which Earth Essentials and EKO products you should buy or how much you need for your vegetable garden or raised beds, please stop in. We’ll be glad to help you. While you’re in the store, we can tell you about the other great lawn and garden products made by Richlawn, including Pro Rich Lawn Fertilizers and Revive.  One thing’s for certain.  When it comes to improving your vegetable garden soil health, fertility and structure, you can count on the quality, organic products produced locally by The Richlawn Company.  


Tuesday, March 22, 2022

How to Test Garden Soil


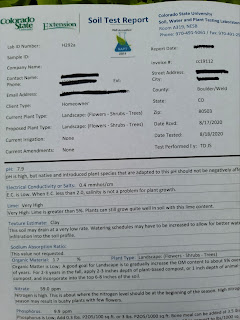
Conducting a soil test will help you make informed decisions on soil amendments and fertilizers, as well as identify potential crop production problems. The key elements affecting our soils are physical structure, including the amount of clay content, the pH and soil fertility.


Testing your garden soil can be accomplished at home using soil test kits or soil samples can be sent to a testing lab for analysis. If you decide to test your soils at home, it’s important to include a test that will measure the acid-alkaline balance, known as soil pH level. Soil pH affects the availability of nutrients to vegetable plants, as well as the microbial activity in your soil.  No matter the quality of the fertilizer or supplements you apply, tomato and vegetable plants can’t use them if the pH is too high.  Soil pH is a measure of the acidity or alkalinity of a soil. On the pH scale, 7.0 is neutral, above 7 is alkaline, below 7 is acidic. Bleach for example is very alkaline. Lemon juice is very acidic. Most plants prefer a pH of between 6.5 and 7. Our soils are typically greater than 7. 


This soil check kit is an easy and quick way to check the pH levels in your garden.  Begin by adding the contents of the green capsule in the test tube. Next, add a small of soil and fill with water. Put the cap back on the tube and shake vigorously.  Match the color of the tube to the chart to determine the pH of your soil.  A pH meter can be used to test soil. Home test kits are also available to measure the Nitrogen, Phosphate and Potash levels in your garden beds. 


For a more extensive test of your garden soil, send a sample to the CSU test lab, located in Fort Collins. You can pick up a mailer and test instructions in the Hardgoods section of the store. The mailer is free, but you do pay a fee to CSU for the test. The basic test includes an analysis of soil structure, pH, salt content and nutrient levels in the soil. The lab will also share their interpretation of the test results. Whether you test your own soil or use the lab at CSU, bring us the results. We'll recommend the right amendments and fertilizers to make your garden soil healthier and more productive. In addition to pH and nutrient levels, the structure, physical makeup and organic content of your soil has a direct impact on your garden’s productivity.


The Jar Test is a quick, easy way to help you determine the structure and physical makeup of your soil. You’ll need a clean jar with a lid, in this case a peanut butter container. Put 4-5 ounces of soil in the bottom of the jar. Add enough water to fill the jar 2/3 full.  Add a drop or two of dishwasher soap. Put the lid on and shake well, then let the jar sit undisturbed for 24 hours. You’ll see that the soil has settled into layers. The first layer will be sand. The second layer will be silt, followed by clay, suspended clay, then a small amount of organic material, floating at the top.


This is evident in the jar on the left. Typically, you’re going to see a small amount of sand and silt, a large percentage of clay and a small amount of organic material. As you add more organic material to your garden, your test results will look more like the jar in the middle. The jar on the right illustrates a well-amended garden soil: dark and rich, with more organic material suspended in with the clay.


To improve your garden soil and lower the pH, we recommend you add two to three inches of locally produced organic material to your garden in the spring and again in the fall. Whether you choose to do-it-yourself or send a sample to the lab in Fort Collins, a soil test will help determine the structure and fertility of your vegetable garden’s soil, key factors in getting the best tomato and vegetable production this season.  


Tuesday, March 15, 2022

The Keys to Growing Healthy Transplants


From the moment seeds germinate, they need extra attention in order to grow into healthy plants. This includes providing the right conditions for optimal development. The three factors that will have the most influence on how well your seedlings grow and develop are light, water and fertilizer. Of these three, adequate lighting is one of the most critical. Seedlings need a consistent source of the right light and most of the time the light coming through a bright, sunny window isn’t going to be enough for your young plants. They will tend to stretch and get thin and spindly looking for light.  


Adding a plant grow light is the best way to ensure your plants get the light they need. You have several choices when it comes to selecting a grow light including fluorescent lights (CFLs), high-output T5s and LEDs. T5s are generally considered the best choice for seedling development. They tend to cost less initially, and the bulbs are replaceable. Select a T5 in the 6400K spectrum, for best seedling growth. Plan to run your grow lights fourteen to sixteen hours per day. It’s also important that your light setup is adjustable, so that you can raise the lights as your plants grow. When your seedlings are small, place your lights five to six inches above the tops of the plants. As the seedlings grow and develop, move the lights up accordingly. Fluorescent lights should be suspended 10 to 12 inches from your seedlings, LEDs 8 to 10 inches and incandescent bulbs 12 to 18 inches.  


Next to light, watering is most important. Check your seedlings every day and keep the soil moist, not soggy. Don't use water that is too cold (or too hot). Fill up your watering can and let it set out overnight. That way the water will be at room temperature when you water your seedlings.  


In order to develop strong stems and root structures, your seedlings need to be fed. Begin fertilizing once your tomato and vegetable plants have 3-4 sets of true leaves. The first set of leaves to emerge are the cotyledons, sometimes referred to as ‘seed leaves”. They are not “true leaves”. The next set of leaves and all subsequent leaves are true leaves.  Use a mild organic fertilizer with a balanced formula such as 2-2-2 or liquid Kelp. Liquid fertilizers are preferable at this stage, because it’s less likely you’ll damage the seedling’s roots than if you used a granular starter fertilizer. Plan to fertilize your seedlings every 7 to 10 days. 


Brush your starts several times a day. Plants, especially tomatoes need movement in order to develop strong stems. Brushing them a couple of times a day makes them stronger.  Or simply install a small fan and run it 5-10 minutes twice a day. 


One other important task is to give your seedlings plenty of room to grow by thinning out weak plants. This is especially important for tomato and pepper starts. 


Whether you’re growing tomatoes, vegetables or flowers, it’s important to supply the right light, water and fertilizer in order to grow the healthiest plants.  


Tuesday, March 8, 2022

March Garden Chores


Warm days in early March make us eager to get out and start gardening and with the days getting longer, it’s the perfect opportunity to get the garden ready for the season ahead. Start by gradually removing any vegetation and debris left from last season. It’s important to proceed slowly because as you’re cleaning up, you’ll discover many perennials and bulbs are starting show.


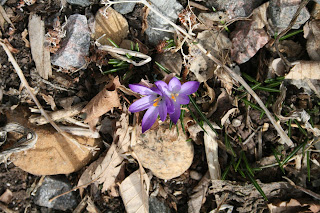
The remains of last year’s garden acts as a mulch, protecting early spring risers such as crocus, hyacinths, daffodils and tulips. Go gently around these bulbs and perennials, because it’s easy to damage them. You may want to switch from a leaf rake to a leaf blower or better yet simply clean up by hand. It’s important to leave some cover to protect these tender starts through the rest of the spring. Stay off those areas of the garden that are wet, in order to avoid compacting the garden soil any more than necessary.


As you're cleaning, you may find evidence of beneficial insect activity like this mantis egg sac. It's important to leave nest undisturbed so it has a chance to hatch naturally in the spring.


Now’s the time to evaluate the soil in your vegetable beds. Soil texture and richness are fundamental to your vegetable garden’s success and testing is something that should be done on a regular basis. Whether you’ve experienced specific problems, such as Tomato Blossom End Rot or you’ve been disappointed in your garden’s overall yields, it’s important to establish a baseline, in order to know how to proceed to improve your soil. You can do this yourself with a simple test kit or you can send a soil sample to the labs at Colorado State University. You’ll get a very comprehensive soil analysis from the labs at CSU. Once you’ve received your test results, bring the report in. We’ll help you choose the products you need in order to implement the changes they recommend.


Foundational to soil quality and heath is the practice of adding organic materials, called amendments. Effective soil amendments for the soils in our area include compost, peat moss and earthworm castings, but before you try digging in your garden make sure the ground is workable. Those areas exposed to the sun should be workable now. More shaded parts of the garden are still too wet to work. A simple way to do this is to grab a handful of soil and squeeze it. If it crumbles when you open your hand the soil is workable. If it stays in a clump, the soil is too wet, and you need to wait.


In your perennial gardens, now is the time to prune back ornamental grasses. They do best if you cut them down to five or six inches above the ground. Summer flowering shrubs such as Buddleia and Bluebeard should also be pruned now. Wait to prune spring blooming shrubs such as Lilac, Forsythia, Spirea until after they bloom. This is also the time to prune Group 3 Clematis. These varieties bloom on new wood in late June into August. They should be cut back to a living bud at about 24" from the ground in spring just as the buds begin to swell. If you don't prune, the flowers will tend to be only up at the top of the plant and the bare stems will be unattractive below. When to prune Clematis can be tricky depending on the bloom time and variety. If you’re not sure, don’t prune.  If you’re uncertain about the blooming habits of the shrubs and vines in your landscape, don’t prune until you’ve had time to observe each plant’s growth and bloom cycle. Hold off pruning your roses until mid-April.


Watch for perennial weeds that may have wintered over. Groundsel, Mallow and others can survive the harshest winter weather, and many are blooming right now. Dig them up or treat with Burnout weed control. Starting your clean up now will mean a more productive gardening season.