www.theflowerbin.net
www.theflowerbin.net
The
prolonged fall has given us a few extra weeks to enjoy some of the hardier
plants in our garden including roses, mums and winter pansies. Now's the time to put your roses to bed, finish
cleaning up the perennial beds and water everything well.

To prune your roses, you'll need
a good pair of pruners, some garden shears and a lopper. These tools will make it easier to prepare your roses for winter's irratic weather.
Most seasonal damage to roses, as well
as trees, shrubs and perennials, comes from winter's fluctuating temperatures,
dry winds and lack of moisture.
You can help reduce winter wind damage by pruning
your roses back to about 24". Check your roses for dead and diseased canes
and for diseases on leaves such as powdery mildew.
If you see any diseased branches and leaves, cut them off and dispose of them. While you're at it, rake
up any leaves on the ground around your roses.
Don’t let them winter over in the mulch and re-infect your roses next
spring. Next, water your roses. Roses
with dry roots will suffer more damage in cold temperatures than roses with
well-hydrated roots.
Last, add
8" to 10" of mulch around the
base of your roses. This mulch will help keep the ground cold and stable during
those warm winter days. Mulch will also help retain moisture. Compost, Cedar
Mulch and Gorilla Hair mulch are good choices for mulching your roses.
Rose collars
help hold the mulch in place through the winter.
While you're at it, finish
cleaning up any perennials still standing.
We left these mums to the last minute
because we had pollinators in the garden
up until a few days ago. They look scraggly, but provide some forage. Water
all of your perennials once you've finished cleaning them up. If you feel like
planting something when you're done with clean up, it's not to late to plant
some spring bulbs and some garlic.
A long-standing Flower Bin tradition continues this weekend as Christmas
begins at The Flower Bin Holiday Open House, Friday, Saturday and Sunday,
November 25, 26 and 27. There will live entertainment featuring Harpist
Charlotte Rose and Jeffrey Rogers on the Hammered Dulcimer.
Charlotte will be
performing Saturday and Sunday November 26 and 27 from 11 am to 1 pm.
Jeffery
will perform Saturday and Sunday November 26 and 27 from 1:30 to 3:30.
Santa
Claus will pay a special visit on Saturday, November 26th, from 10 am to 3 pm
and Sunday November 27th from 2:30 pm to 4:30 pm.
Bring your camera for great family shots with
Santa.
Enjoy holiday cookies and apple
cider while you shop the best in holiday decorations including:
live and cut
Christmas trees, wreaths, garland, ornaments
and featuring stunning Flower Bin
grown Poinsettias.
Start a tradition by making the Christmas Open house a “Must
Do” to kick off your holiday season.

Most
of us don't think about watering our trees right now. It's November, most of
the leaves have dropped and the trees look as if they've gone dormant, but the
fact is there's still a lot of activity going on underground. Tree roots
continue to grow throughout the late fall and winter and because of this, they
need moisture to survive. Usually we've had some natural moisture by this time
of the year, but it continues to be dry so it's important to water your trees
now and throughout the fall and winter months, especially if the weather
remains dry and windy. Trees should be watered slowly. Slow watering helps
ensure the water will penetrate the ground and not run off. A good rule of
thumb to remember is your tree needs about 10 gallons of water per inch of trunk
diameter.

Measure the tree trunk's diameter about knee high. In this case, the
trunk diameter is 3". Based on 10 gallons of water per inch of trunk
diameter, this tree needs 30 gallons of water, each time you water. There are
several methods you can use to water your trees. Assuming your sprinkler system
is shut off by now, you can use a hand sprinkler, a simple lawn sprinkler, a
soil needle or even a 5 gallon bucket with holes drilled in the bottom.
Regardless of how you water, the best place to water is around the drip line of
the tree.
The drip line is the point on
the ground where water will drip off the widest-reaching branches.
Lawn
sprinklers are available in different patterns including circular, square and
rectangle. Pick the sprinkler with the pattern that best suits the area you're
watering. Place the sprinkler under the drip line of the tree and let it run
for 4 - 5 minutes, then move it, following the drip line of the tree.
4 to 5
minutes is the average time it takes to fill a 5 gallon bucket, at low water
pressure. You can use this as a gauge to figure out how long you need to let
the sprinkler run before you move it. If you need to deliver 30 gallons of
water to the tree, move the sprinkler 6 times, letting it run in place for 4 to 5
minutes each time.
If you choose, you can use a soil needle instead of a
sprinkler. Work the needle about 8" into the soil, turn on the water on
low pressure and let it run. After 4-5 minutes, move the needle about a foot,
then push it into the ground. Repeat this
until you've worked around the drip line.
Another technique is to drill ¼"
holes in a 5 gallon bucket, set the bucket on the drip line and fill with
water. The water will slowly seep out of the bucket and into the ground. If you
set 2 or 3 buckets around the dripline, watering will go quickly and
effectively. It is especially important
to water trees that are root-limited because they were planted between the
sidewalk and the street.
If you can't get to the drip line because of sidewalks or landscape restrictions, you can hand water the area under the tree. Watering during the fall and winter will make a big
difference in the long-term health of your trees.

Have
you seen trees with dead or damaged areas on the trunk? When the damage occurs
on the south or west side of the tree trunk, it is most likely caused by
sunscald. It’s not unusual for winter temperatures to reach 60° Fahrenheit in
the daytime and then fall below freezing after the sun goes down. When it gets
this warm during the day, the low winter sun heats up the tree bark, especially
on the south and southwest sides of the tree. The sun’s warming action breaks
the tree's dormancy and the cells on that side of the tree wakeup and become
active. When the temperatures fall after
sunset, the active cells and tissue die. The damaged area will often shrink and
discolor.

Later in the season, the bark may fall off, leaving a long scar.
Applying tree wrap now is a quick and simple way to protect the tree from the
winter sun.
Tree wrap is a corrugated paper product, sold in 50' and 150'
rolls.
Start at the base of the tree and spiral the wrap upward to the first
primary branch.
Overlap each turn about 1/3rd.
Once you reach the first set of
branches, loop the tree wrap over a strong, sturdy branch and tape it, so it
will stay in place. A good rule of
thumb is to wrap your trees around Halloween and remove the wrap around Easter.
You want to leave the tree wrap off during the growth months of spring and
summer, then reapply in late fall. You should wrap trees for the
first six or seven years after you plant them. After that, the bark should be
thick enough to reduce the risk of sunscald damage and you shouldn't have to
apply tree wrap every year. Once you've got the trunk wrapped, give the tree a
good soaking. Trees can handle winter weather better, if you water them now.

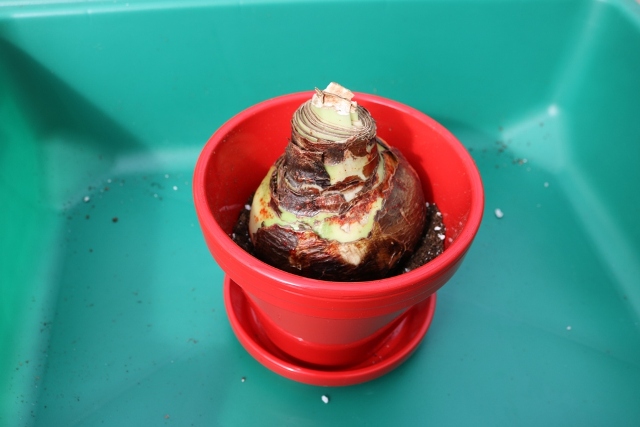
Amaryllis
are classic holiday flowers that display the colors of the season. It takes
about 6 weeks for amaryllis to bloom, so if you want blooms for Christmas, you
need to start your amaryllis bulbs now. Amaryllis bulbs are easy to grow and
their blooms last a long time.
Begin by selecting quality bulbs. Look for bulbs
that are firm and dry and still have some of their natural papery covering.
You’ll find amaryllis bulbs graded as small, medium and large. Generally the
larger the bulb size, the more stalks and blooms it will produce.

Once you've
chosen the bulbs you want to start, it's time to pick out a container. You can
grow amaryllis in ceramic pots, clay pots or plastic pots. Whichever container
you select needs to have good drainage. It's also important to know that
amaryllis like to be snug in their pot, so select a container that's about an
inch or so larger than the bulb and is deep enough for the roots to grow.
Next,
add damp potting soil to the bottom third of the pot. Place the bulb in the
center of the pot and spread the roots out so the fan out from the center of
the bulb. Do the best you can with the roots. You're mainly trying to keep the
roots from being bunched together under the bulb.
Fill in around the bulb
with more damp potting soil. Leave the top third of the bulb uncovered. Water
thoroughly and place the bulb in a warm, well-lit location.
Once the flower
stalk begins to appear, you can start feeding your bulb with a 20-20-20
fertilizer. After that, fertilize every two weeks and water frequently enough
to keep the soil moist.
You can also grow amaryllis in stones and water, by using
a forcing vase. Trim off dried roots to prevent them from decomposing in the
water. This will help keep the water cleaner, longer. Add water to the container
until it just touches the bottom of the bulb. Place the container in a bright,
warm location. In about 6 weeks, your amaryllis should begin to bloom. For colorful blooms throughout the holidays,
plant amaryllis bulbs every three to four weeks, starting now.

 Most seasonal damage to roses, as well
as trees, shrubs and perennials, comes from winter's fluctuating temperatures,
dry winds and lack of moisture.
Most seasonal damage to roses, as well
as trees, shrubs and perennials, comes from winter's fluctuating temperatures,
dry winds and lack of moisture.
 You can help reduce winter wind damage by pruning
your roses back to about 24". Check your roses for dead and diseased canes
and for diseases on leaves such as powdery mildew.
You can help reduce winter wind damage by pruning
your roses back to about 24". Check your roses for dead and diseased canes
and for diseases on leaves such as powdery mildew.


 If you see any diseased branches and leaves, cut them off and dispose of them. While you're at it, rake
up any leaves on the ground around your roses.
Don’t let them winter over in the mulch and re-infect your roses next
spring. Next, water your roses. Roses
with dry roots will suffer more damage in cold temperatures than roses with
well-hydrated roots.
If you see any diseased branches and leaves, cut them off and dispose of them. While you're at it, rake
up any leaves on the ground around your roses.
Don’t let them winter over in the mulch and re-infect your roses next
spring. Next, water your roses. Roses
with dry roots will suffer more damage in cold temperatures than roses with
well-hydrated roots.
 Last, add
8" to 10" of mulch around the
base of your roses. This mulch will help keep the ground cold and stable during
those warm winter days. Mulch will also help retain moisture. Compost, Cedar
Mulch and Gorilla Hair mulch are good choices for mulching your roses.
Last, add
8" to 10" of mulch around the
base of your roses. This mulch will help keep the ground cold and stable during
those warm winter days. Mulch will also help retain moisture. Compost, Cedar
Mulch and Gorilla Hair mulch are good choices for mulching your roses.
 Rose collars
help hold the mulch in place through the winter.
Rose collars
help hold the mulch in place through the winter.
 While you're at it, finish
cleaning up any perennials still standing.
While you're at it, finish
cleaning up any perennials still standing.
 We left these mums to the last minute
because we had pollinators in the garden
up until a few days ago. They look scraggly, but provide some forage. Water
all of your perennials once you've finished cleaning them up. If you feel like
planting something when you're done with clean up, it's not to late to plant
some spring bulbs and some garlic.
We left these mums to the last minute
because we had pollinators in the garden
up until a few days ago. They look scraggly, but provide some forage. Water
all of your perennials once you've finished cleaning them up. If you feel like
planting something when you're done with clean up, it's not to late to plant
some spring bulbs and some garlic.