With
their colorful foliage, Coral Bells (Heucheras) , will make a statement in
your garden, all season long. These perennials feature a wide array of foliage
color, texture and shape.
Grown mainly for their colorful foliage, heucheras do
bloom. Their dainty bell-shaped, little
flowers extend high above the foliage, nodding in the wind. The flowers are
what gives this native plant its common name, Coral Bells. You'll find Heuchera and Heucherella grouped
together on the same display tables. That's because they are virtually the same
plant in characteristics and behavior. Heucherella is a cross between Heuchera
(Coral Bells) and Tiaella (Foam Flowers) and are commonly called Foamy Bells.
Easy to grow, Heucheras and Heucherellas are
one of the best ground cover plants for your shady perennial garden. Heucheras
and Heucherellas are both rated hardy for Zones 4 through 9 (here on the
plains, we are typically rated Zone 5). Coral Bells grow naturally in wooded
areas, so you'll want to plant them in a spot where they are shaded from the
sun.
They do best in well-amended soils, so plan to incorporate organic
material into the planting site soil.
Once the site is prepared, add some Root Stimulator, before planting.
There are many hybrids and cultivars to choose from. Some examples of these
are:
Monday, July 25, 2016
Monday, July 18, 2016
Hardy Hibiscus
This
is the time of the growing season that one of the most spectacular flowering
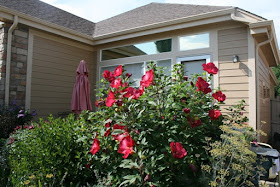
shrubs begins to bloom. Hibiscus x moscheutos or hardy Hibiscus are tough,
resilient garden shrubs that can take
our winters and come back strong. Sometimes called rose mallow, these hibiscus
were developed from native plants and
are now hardy down to Zone 4. Hardy hibiscus are fairly easy to grow. They like
their place in the sun, so select a site in the garden where they'll get as
much sun as possible. They can be grown in partial shade, such as an
East-facing location, but the flower production may not be as great.
Once
established, hardy hibiscus can easy grow 6' high and 6' across so keep this in
mind when you're choosing a planting spot. There are dwarf varieties of hardy
hibiscus that only get about 3' tall and 3' wide, if you don't have room for a full size shrub.
Hardy hibiscus like well drained soils,
so prepare the planting site by adding compost or peat moss to your existing
soil at the rate of about 50:50.
Add some Root Stimulator to the planting hole
to ensure good root production. Planted now, you should get flowers yet this
season Hardy hibiscus flowers only last a day, but the flower production will
go on all season, right up to first frost. In our area, the canes will die back
after the first hard frost. When they do die back, cut the canes to the ground.
Water the root ball occasionally during the winter. Hardy hibiscus are among
the last plants to emerge in the spring, so give them plenty of time. To often,
people think the shrub died over the winter when in fact it's still alive, just
dormant and slow to emerge. Some of the spectacular color choices in hardy
hibiscus shrubs include:
'Copper Queen',
'Fireball',
'Mocha Moon',
'Pink Clouds'. Planting hardy hibiscus will
add unique color to your garden landscape for many seasons to come.
Monday, July 11, 2016
Plant Perennials Now
Summer
is great time to plant perennials. Whether it's filling in an empty spot in the
garden, moving a plant from one location to another or maybe you just moved
into a new home and want to get your landscape started, or you've got the week
off and want to work in the garden. The simple answer is yes, you can
plant perennials this time of year. Your
plants will survive and thrive if you keep these things in mind. Do your actual
planting during the coolest part of the day. Early morning is usually best,
though late afternoon into early evening will work, if it's cloudy. Do the hard
work in advance. Get the planting spot ready by digging the hole as deep and
twice as wide as the container your plant is in.
Improve the planting site by
adding organic material such as Sheep,
Peat and Compost, peat moss, compost or coconut coir to the hole and to the dirt you just dug out.
Mix the organic material 50:50 with the existing soil or roughly half. This is
called "amending the soil" and
products such as compost, peat moss, coconut coir, aged manures are
called "soil amendments". Adding amendments will make our typical
clay soils more useable to the plant. Amendments allow the clay soil to drain
better and frees up nutrients in the soil. Once the hole is dug and amended,
fill it with water and let the water drain. Do this twice, before you plant.
This will ensure the soil around the plant's root ball is wet. If you want to
add some Root Stimulator, now is the time to do so. Water your plants
thoroughly before planting or transplanting them.
Now that the ground is ready take your plant out of its container and take a look at the root ball. If it is really tight, break it up
a little before you plant it. Place the plant in the center of the hole and
fill in the hole with the amended soil. If you're transplanting an existing
plant, dig as large a root ball as possible.
Use a garden fork (digging fork),
not a shovel to dig the old plant up. The digging fork is less likely to damage
the plant's roots. Use burlap or an old nursery pot to transport the plant to
its new location. Once you're done planting or transplanting and you've filled
in the hole, water thoroughly. Heat and drying winds will be the biggest
challenge to anything you plant or transplant now. Check your plants in the morning and evening
to make sure they're well hydrated.
A moisture meter is a handy tool to have at
this point. You can easily check the moisture level at different depths and add
water accordingly.
Another trick is to set up some temporary shade in the form
of cloth Seed Guard or burlap to shade the plant while it gets
established. Good soil preparation and
keeping an eye on the watering will ensure your new summer plantings will take
off quickly.
Monday, July 4, 2016
Is Dog Tuff™ grass right for your lawn?
African
dogtooth grass was discovered by Denver Botanic Gardens’ Panayoti Kelaidis in
the early 1980's. In the late '80's, Colorado horticulturalist Kelly Grummons
recognized the grass might have a use in Colorado lawns and through his
extensive testing, developed Dog Tuff™.
The resulting grass, Dog Tuff™ was
recognized in 2015 by the trade group Direct Gardening Association and in 2016
by Plant Select. Dog Tuff™ is a warm weather grass, so the time to plant it is
now as opposed to Kentucky Blue grass and Perennial Rye, which are cool weather
grasses and are planted in the spring and fall. Dog Tuff™ doesn't produce
seeds.
It is grown from cuttings or clones. Dog Tuff™ is typically low-growing,
so it doesn't need to be mowed. This grass is more drought tolerant than
buffalo grass, so it takes less water. It doesn't need to be fertilized and it
does okay in our clay soils. If you decide to plant Dog Tuff™ you'll need to
get rid of your existing lawn. You can do this by covering the area with a dark
tarp and letting the sun kill it off (solarizing),by applying 20% acetic acid
(horticultural vinegar) or citric-based Avenger™. Plan to water the area thoroughly before
planting.
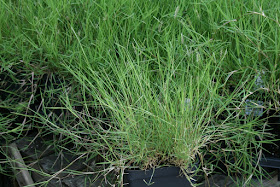
You'll buy Dog Tuff™ in plugs, such as these. Plugs are typically
planted 12" apart at the same depth as they came out of the container.
Once established, you can apply corn gluten to prevent weeds from coming up
between the plugs. Corn gluten also releases a small amount of Nitrogen into
the soil as it breaks down. Some things to consider before planting Dog Tuff™.
This is warm weather grass, which means it won't green up before May and it
will go dormant and turn brown with the first frost in fall. The other thing to be concerned about is Dog Tuff™ can be very aggressive,
spreading it's roots into gardens and neighboring lawns. At the very least, you should plan a 3' to 4' open space
between the Dog Tuff™ and other areas where you may not want grass. In the end, Dog Tuff™ may be best used in a small, well-controlled space such as a dog run, rather than an entire lawn.


