Tuesday, March 28, 2023

A Guide to Testing Garden Soil


Now’s the time to evaluate the soil in your vegetable beds. Soil texture and richness are fundamental to your vegetable garden’s success and testing is something that should be done on a regular basis. 

The value of performing a soil test on your garden is the information you gather will help you make informed decisions on soil amendments and fertilizers, as well as identify potential crop production problems. The key elements affecting our soils are physical structure, including the amount of clay content versus organic material and soil pH. Soil fertility and availability of nutrients also has an impact on crop production.   


Whether you’ve experienced specific problems, such as Tomato Blossom End Rot or you’ve been disappointed in your garden’s overall yields, it’s important to establish a baseline of your garden soil, to know how to proceed to improve your soil.  


Testing your garden soil can be accomplished at home using soil test kits or soil samples can be sent to a professional testing lab for analysis.  


If you decide to use a lab, you can send a sample to the Colorado State University Soil Testing lab for a more intensive evaluation of your soil. The CSU soil testing lab has moved to: 

Soil, Water, and Plant Testing Lab 
4817 National Western Dr. 
Denver, CO 8021 

For more information, follow this link: 


If you decide to test your garden soil at home, it’s important to include a test that will measure the acid-alkaline balance, known as soil pH level.  


Soil pH affects the availability of nutrients to vegetable plants, as well as the microbial activity in your soilNo matter the quality of the fertilizer or supplements you apply, tomato and vegetable plants can’t use them if the pH is too highSoil pH is a measure of the acidity or alkalinity of a soil. On the pH scale, 7.0 is neutral, above 7 is alkaline, also called basic or “sweet”. Below 7 is acidic, sometimes called “sour”. Most plants prefer a pH of between 6.0 and 7. Our soils are typically greater than 7.


This soil check kit is an easy and quick way to check the pH levels in your gardenBegin by adding the contents of the green capsule in the test tube. Next, add a small amount of soil and fill the capsule with water. Put the cap back on the tube and shake vigorouslyMatch the color of the tube to the chart to determine the pH of your soilHome test kits are also available to measure the Nitrogen, Phosphate and Potash levels in your garden beds. 


Soil test meters are also available. Some are single function, such as pH only. Others are multi-function, testing pH, as well as nutrients. 


In addition to pH and nutrient levels, the structure, physical makeup and organic content of your soil has a direct impact on your garden’s productivity. The Jar Test is a quick, easy way to help you determine the structure and physical makeup of your soil.


You’ll need a clean jar with a lid, in this case a peanut butter container. Put 4-5 ounces (about 147.87 ml) of soil in the bottom of the jar. Add enough water to fill the jar 2/3 fullAdd a drop or two of dishwasher soap. Put the lid on and shake well, then let the jar sit undisturbed for 24 hours.


You’ll see that the soil has settled into layers. The first layer will be sand. The second layer will be silt, followed by clay, a layer of suspended clay, then a small amount of organic material, floating at the top. Typically, you’re going to see a small amount of sand and silt, a large percentage of clay and a small amount of organic material.


As you add more organic material to your garden, your test results will look more like the jar in the middle. The jar on the right illustrates a well-amended garden soil: dark and rich, with more organic material suspended in with the clay. To improve your garden soil and lower the pH, we recommend you add two to three inches of locally produced organic material to your garden in the spring and again in the fall. 


Whether you choose to do-it-yourself or send a sample to the lab, once you’ve received your test results, bring the report in. We’ll help you choose the products you need to implement the changes recommended in your report.   


Thursday, March 23, 2023

Spring Garden Chores

If you’re familiar with the adage “March comes in like a lamb and goes out like a lion” you’ll appreciate the general unpredictability of our March weather. March arrived this year with a high of 35°F and wind and snow forecasted off and on, then bounced close to 60° mid-month. That’s why as gardeners, eager to get going, it’s important to keep an eye on the forecast, start slowly and be prepared for changes in the weather. 

Begin gradually by removing any vegetation and debris left from last season. It’s important to proceed carefully because as you’re cleaning up, you’ll discover many perennials and bulbs are starting to show. The remains of last year’s garden acts as a mulch, protecting early spring risers such as crocus, hyacinths, daffodils and tulips.


Go gently around these bulbs and perennials, because it’s easy to damage them. You may want to switch from a leaf rake to a leaf blower or better yet simply clean up by hand. It’s important to leave some cover to protect these tender shoots through the rest of the spring. Stay off those areas of the garden that are wet, to avoid compacting the garden soil any more than necessary.  


As you're cleaning, you may find evidence of beneficial insect activity like this mantis egg sac. It's important to leave the nest undisturbed so it has a chance to hatch naturally in the spring  


Now’s the time to evaluate the soil in your vegetable beds. Soil texture and richness are fundamental to your vegetable garden’s success and testing is something that should be done on a regular basis. Whether you’ve experienced specific problems, such as Tomato Blossom End Rot or you’ve been disappointed in your garden’s overall yields, it’s important to establish a baseline, to know how to proceed to improve your soil.


You can do this yourself with a simple test kit. Colorado State University Soil Testing lab has moved to: 

Soil, Water, and Plant Testing Lab 
4817 National Western Dr. 
Denver, CO 8021 


Once you’ve received your test results, bring the report in. We’ll help you choose the products you need to implement the changes they recommend. Foundational to soil quality and health is the practice of adding organic materials, called amendments. Effective soil amendments for the soil in our area include compost, peat moss and earthworm castings, but before you try digging in your garden make sure the ground is workable.  


Those areas exposed to the sun should be workable now. More shaded parts of the garden are still too wet to work. A simple way to do this is to grab a handful of soil and squeeze it. If it crumbles when you open your hand the soil is workable. If it stays in a clump, the soil is too wet, and you need to wait.  


In your perennial gardens, now is the time to prune back ornamental grasses. They do best if you cut them down to five or six inches above the ground.  


Summer flowering shrubs such as Buddleia and Bluebeard should also be pruned now. Wait to prune spring blooming shrubs such as Lilac, Forsythia, Spirea until after they bloom.  


This is also the time to prune Group 3 Clematis. These varieties bloom on new wood in late June into August. They should be cut back to a living bud at about 24" from the ground in spring just as the buds begin to swell. If you don't prune, the flowers will tend to be only up at the top of the plant and the bare stems will be unattractive below. When to prune Clematis can be tricky depending on the bloom time and variety.  


If you’re not sure, don’t pruneIf you’re uncertain about the blooming habits of the shrubs and vines in your landscape, don’t prune until you’ve had time to observe each plant’s growth and bloom cycle. Hold off pruning your roses until mid-April.  


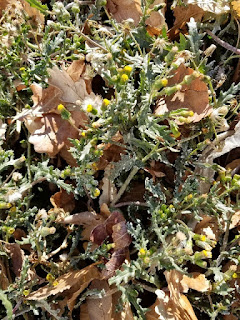
Watch for perennial weeds that may have wintered over. Groundsel, Mallow and others can survive the harshest winter weather, and many are blooming right now. Dig them up or treat them with weed control.  


Now’s the time to do dormant spraying. Dormant spraying involves applying a preventative spray in late winter while fruit trees, deciduous trees and ornamental shrubs are still dormantThe “dormant” part of “dormant oil” describes the timing of the oil’s application, rather than the type of oil.  Also called horticultural oil, the active ingredient in dormant oil is mineral oil. Applied now, this oil suffocates scale, aphids, mites, and other insects wintering over, reducing insect activity later in the growing season.  


Starting your clean up now will mean a more productive gardening season.