Tuesday, October 25, 2022

Plant These Bulbs for Early Spring Color


While tulips are the mainstays of the flowering garden in April and May, there is a group of bulbs that bloom much earlier in the season. Planting these bulbs now will extend the bloom season in your landscape from late winter into early spring.  These bulbs are perfect for planting in groups as well as mixing and matching and will provide a welcome sight in early spring, often blooming through the snow.  

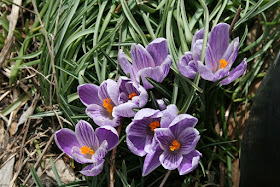
Brightly colored crocus blooms are followed in succession by dwarf iris, grape hyacinths, regular hyacinths, and early daffodils. 


Crocuses are the first of the bulbs to bloom, adding bright, bold color to the very early spring landscape. Crocuses prefer direct sun and thrive in sites that get at least 6–8 hours a day.  They offer support for early foragers.


Muscari, known as grape hyacinths, are hardy spring bloomers that produce blue or purple flowers that look like bunches of grapes, hence the common name. They will do well in sun or semi-shade and over time will spread naturally.


As an accent bloom, petite dwarf iris will add low-growing color to the front of a border planting. Iris Reticulata, Sapphire Beauty and Katherine Hodgkin are just a few of the miniature or dwarf iris available to plant now.


Available in a variety of colors, regular hyacinths bring height as well as fragrance to the early garden. Plant them in full sun to partial shade.


Early blooming daffodils such as Rip van Winkle offer their own distinct color and form, making them a popular choice for early spring blooms.

 All of these bulbs are hardy in our gardening zone, meaning they will survive our winters and bloom season after season, with just a little care.  

 Regardless of the variety of bulbs you choose, all bulbs will do best when planted in well-amended soil, in a sunny spot in the garden. In our area, well-amended soils are achieved when locally produced, organic products are added to the existing soil.  

Once the soil is prepared, dig in some Dutch Bulb Food. Added at planting time, this fertilizer will improve rooting and bulb growth. When it comes to planting, a good rule of thumb is to plant bulbs to a depth of three times their height.


A one-inch crocus bulb should be buried flat side down, three inches deep, as measured from the shoulder. You can vary the bloom time by the depth you plant each bulb. Shallow planted bulbs will bloom earlier; deeper bulbs will bloom later in the season. The risk with planting too shallow is the bulb may not survive the winter. Another trick to control bloom time is to add two or three inches of mulch to the bed. This will keep the ground cold and slow bloom time.  


For best effect, early bulbs should be planted in clusters, not lined out in rows.  Check on your bulbs through the winter. They should be watered every four to five weeks, along with the rest of the trees and shrubs in your landscape.   


Bulbs planted now will produce blooms the first year, helping bridge the gap between winter and traditional spring-blooming bulbs such as daffodils and tulips. 


If you have questions regarding selecting and planting bulbs, stop in the store. We'll be glad to help you. 


Tuesday, October 18, 2022

Now’s the Time to Winterize Your Lawn


Our typical Colorado winters can be rough on lawns, so it’s important to take time now to prepare your grass for the season ahead. There are three steps you need to do now to get your lawn ready for winter and off to a great start next spring. Two steps focus on improving the soil your grass plants are growing in and include aeration and the incorporation of organic materials into the landscape. Step three is to feed the lawn with winter-specific fertilizer.


Your lawn is already responding to October’s cooler weather. The grass isn't growing as vigorously and typically, you're mowing less frequently. While top growth has slowed down, grass roots are still very active storing nutrients and moisture, getting ready for the winter season.  All this activity at the root level makes this an important time to build soil structure and to feed your lawn.


This is accomplished by first aerating the lawn, then adding organic material to soil in the form of humate. Aeration is important because it relieves compaction and opens the soil, which allows air, water, and fertilizer to penetrate to the roots. You can do aeration yourself or hire it done. Just make sure you get a good core extraction, not just punch holes in the ground.


Next, add granular humate to your lawn. Granular humate will break down clay, improve soil structure and increase microbial activity in the soil. 


Humate will also help your grass take up nutrients more effectively and stay greener with less water. After applying Humate, water in thoroughly and you're ready to choose a winter-specific lawn fertilizer.


A good winterizer fertilizer should contain more Nitrogen than Phosphate and Potash. Typically, the numbers on the bag will read something like 25-5-6. Nitrogen is always listed first, Phosphate second and Potash third. The numbers represent the percentage of Nitrogen, Phosphate and Potash in the bag. For example, a twenty-pound bag of 25-5-6 winterizer fertilizer contains 5 pounds of Nitrogen, 1 pound of Phosphate and 1.2 pounds of Potash.


Fertilizers applied at this point in the season do not contribute to significant top growth. Instead, the Nitrogen component in these fertilizers is absorbed by the root system. This will ensure there’s enough food available for a quicker green-up and stronger top growth early in the spring season. Phosphates and Potash in winterizer fertilizers build strong root system which helps the grass crowns survive the winter.


Over the next few weeks, gradually lower your mower's height so that the last cutting will be about two- and one-half inches tall. 


During the winter, use a simple sprinkler to water your lawn every four to five weeks.  This will also benefit the trees and shrubs planted in or near your lawn. Winter watering is especially important where the lawn and trees are surrounded by sidewalks and streets. Do this when the temperature is above 40°F. Taking these steps now will help ensure a healthier lawn next spring. 


Tuesday, October 11, 2022

Now’s the Time to Put the Vegetable Garden to Bed


Putting the vegetable garden to bed in the fall is a process which includes a complete clean up, improving the garden soil and preparing for next spring. It’s important to remember that what you don’t accomplish in the garden now, you’ll need to do in the spring, when you’re eager to plant your garden, not clean it up. Garden chores done now, allow you to focus on planting in the spring, knowing that your garden beds are healthy, and your soil is ready.  


Before you start with the actual cleanup, take some time to make some notes in your journal about how your garden did this year, including which plants did well and which ones didn’t. Better yet, use your smart phone to take some pictures to go along with your written journal. Doing these things will help jog your memory when it comes to choosing which varieties of vegetables and tomato plants you want to grow next year.   


Now that you’re ready to start, plan to do a thorough cleaning of your vegetable garden.  Leaving tomato plants, cucumber vines and other vegetable plant debris in your garden after you've finished harvesting, will provide hiding places for pests and plant diseases, giving them a head start on your garden next spring.


The second reason for fall cleanup is to facilitate adding organic material to your garden bed while the soil is warm and workable. Healthy soil is key to your garden and with your garden or raised bed clean, now’s the time to amend your soil. Plan to add 2" to 3" of organic materials to your existing soil. This can be in the form of packaged organic compost, granular humate and earthworm castings that you can easily transport and work into the garden. Adding organic material will improve soil structure and increase microbial activity, which leads to stronger root development and improved nutrient uptake, which will help improve yields overall next season.


Three, protect your garden soil through the winter with cover crops and mulch.  Winter rye, buckwheat and oats are good choices for cover crops.  Cover crops are planted now to protect your garden soil’s microbial life as well as improve soil structure through the winter season. Tree leaves are also a good choice to protect your soil through the winter.


Shredded leaves can be broadcast over the garden, providing protection for soil structure and microbial life. Come spring, the decomposing leaves can be worked into the garden soil or added to your compost pile. Added together, cover crops and organic material will build and maintain healthy, microbial-rich soil, a sure way to improve the yields in your garden next season.  Make fall garden clean up a part of your routine. It will set up your vegetable garden for a great start next spring.   

Tuesday, October 4, 2022

Now’s the Time to Plant Spring Flowering Bulbs


If you’ve been looking for ways to bring more color and interest to your spring garden, planting flowering bulbs is a great place to start. The keys to achieving this profusion of early season color is to get started now.  


Available in a rainbow of colors, these hardy bulbs start showing up in early spring when the crocus poke their heads up through the snow, followed soon by the daffodils and then a parade of tulips.  The best time to plant these flowering bulbs is now, in October. The soil temperature is cooler, but still warm enough to allow the bulbs to root before the ground freezes.


Begin by selecting quality bulbs. Choose bulbs that are firm and light tan in color. As you’re selecting your hardy bulbs, consider bloom time. Planting combinations of early, mid, and late-season bulbs will extend the spring flowering season. Save the tag or mark the bag so you will remember the variety. 


Crocuses are the earliest of the spring blooming bulbs, followed by daffodils, hyacinths and then tulips – early, mid, and late.  As a general guideline, early tulips will bloom late March to mid-April. Tulips marked mid-season will bloom mid-April to early May. Tulips labeled late will bloom from early to mid-May. Bloom time can vary depending on where bulbs are planted in the landscape as well as how deep they’re planted.


For example, the soil around a sunny area near a foundation will warm up sooner that other places in the garden and bulbs may begin to emerge. If this happens, throw a 5” to 6” layer of mulch on the planting bed. This will keep the soil cooler and slow bulb growth.


For added interest, consider a few of the specialty bulbs such as Anemones, or Grape Hyacinths.


Bulbs are available in individual containers or as pre-packaged assortments. Loose-packed bulbs allow you to mix and match color, height, and bloom time. Pre-packed bulbs are convenient.  The arrangement is ready for you to take home and plant. That said, choosing from containers allows you to select each bulb individually. 


When planning your bulb garden, it’s important to decide whether you’re going to plant a formal bed or scatter the bulbs throughout your landscape for a more natural look. There are several advantages to planting your bulbs in your perennial beds or open spaces. You’ll be adding early color to an otherwise bare space in your gardens and as your perennials emerge, they’ll help mask the bulb foliage as it fades. 


Whether you choose a natural look or a more formal planting, your bulbs will bloom best if you plant them in a site where they’ll receive at least six hours of sunlight. Prepare the site by amending the existing soil with organic material. Plan to lay down two to three inches of amendments to the site, then mix thoroughly with the existing soil to a depth of six to seven inches. You can use a garden spade or garden fork to prepare the ground.  Once the site is prepared, you’re ready to plant your bulbs. A good rule of thumb is to plant each bulb pointed side up, at a depth that’s equal to three times the bulb’s height. In other words, a two-inch tall bulb should be planted six inches deep.  Spacing between bulbs should be about a bulb’s width apart.


This is a good time to add some Dutch Bulb Food, then cover the fertilizer lightly with soil. This allows the bulb to root into the fertilizer. Next, place eight or ten bulbs flat side down in the planting hole. Cover the bulbs with soil and water thoroughly. You may choose to plant some of your bulbs in existing perennial beds. In this case, a bulb planter or bulb auger allows you to easily dig a hole and plant your bulbs without disturbing any perennials or shrubs already planted there. Once planted, mark the spot and water the site thoroughly. Check on your bulbs through the winter. They should be watered every four to five weeks, along with the rest of the trees and shrubs in your landscape. Bulbs planted now will offer a profusion of spring color for many seasons to come.